Sunday, October 23, 2022

Joanie's Van

 Our friend Joanie got a new van, so I took this as an excuse to play around with 3D software a bit to design the shelves for the interior. Here is what we came up with after a number of discussions:

Here's a little movie:

Nowadays, Joanie wings most of the time, so the rack has been designed primarily for that. But on occasion, she may want to take a couple of surf and windsurf boards on a trip, so we added shelves for those, too. With 2 boards on the top, the shelf could hold 5 boards, with plenty of empty space in the van.

The wing board will be the board shell handle the most, so the bottom rack is designed to make that easy. The idea is to slide the board onto a big piece of wood, which may be painted or covered with plastic to allow for wet boards. In front will be 2 fixed "bumpers" - think of yoga blocks - that keep the board in place. In the back, there are a couple more yoga blocks to keep the board from moving around. To take the board out, she'll just remove the block in the back, and then slide the board out. On the sides, there are a couple of boards that keep the board from sliding out to the side. They'll be covered with yoga mat pieces or similar. For longer trips, the board has holes in the front and back so that the board can be strapped down.

Above is another solid wood board that makes a shelf for the wings. If there are no windsurf boards in the van, that shelf should easily hold all of Joanie's wings (and she has quite a few!). But there's also space on the ground, below the shelves.

One concern was that stuff might fly around and become dangerous in an accident, so we paid special attention to fix the rack in place. The support studs on the left side will each be mounted with two connectors to the L tracks on the side of the van. The right supports will be fixed at the bottom to a piece of wood or aluminum that is attached to the L tracks at the bottom. The front support on the right will also be attached at the roof.  Boards will be strapped to the top shelves. All connectors and screws will be stainless steel. The individual L track connectors are rated to 1833 lb, so the setup should survive collisions without releasing the attached gear.

I created the model in Blender. Most measurements should be reasonably accurate, except that the thickness of the support studs etc. may vary, depending on what is available. Additional images are below. The large boxes in the images are 1 foot tall, the small boxes 1 inch. The original Blender file is available here

If you want to look at the model interactively with your browser, you can download the design file in .dae format, and use an online 3D viewer like the one at 3dviewer.net/. A tip for 3dviewer.net: after opening the downloaded .dae file using drag & drop, select the hierarchical view on the left, and hide the "Van sides" by clicking on the eye - it should look like this:

Here are views from the different sides (screen shots from Blender). View from the back (click on images for a larger view):

From the side:

From the top:

From the top, with the middle shelf removed:
The two holes for the strap at the front in the wing board support are visible, the ones in the back are hidden by the shelves above it. 

3D view from the back right: 
3D view from the back left:

The little grey cylinders indicate where the supports are attached to the L tracks on the side of the van. Those may not be cylinders, but rather pieces of wood or something else in the right size to bridge the distance to the side of the van (which is about 7 inches wider in the middle than at the top). For screwing the connectors into the L tracks, Joanie ordered US Cargo Control L Track Double Lug Threaded Stud Fittings from Amazon.

Building the rack would be a lot of fun, but it would take me forever, and I'm supposed to work (at least on the non-windy days :-). So I'll have to leave that to someone else - but learning to use Blender while developing the design was a lot of fun.


Thursday, October 20, 2022

Flatter Is Better

 We had great wind yesterday, and went winging. The session, however, was anything but great. So many things did not go as planned .. I don't really want to talk about it. But I'll say one thing: it was choppy.

Today's wind was very similar, but fortunately, the session was not. Fortunately, my lovely wife had suggested a change of scenery: Wacky Bay. That's were I had my first wing foil session that felt like fun about 3 months ago, so convincing me to forgo the chop for some flat water was not too hard. 

I'll tell you the story with little bits and pieces from my GPS tracks today. Here's the start of the session:

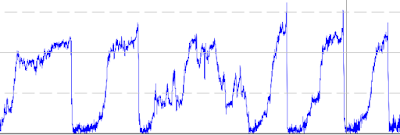
The drops after each run means my initial jibe attempts were quite bad, and usually wet. Notice how several times, the speed quickly increases a lot, followed by a sudden drop. That means I stayed true to my plan to not move the back foot forward when starting a jibe. I did, however, start the carve exactly the same way I had done many thousand times on a windsurfer: with most of my weight on the back foot. Not only did my muscles remember that "this is the way to turn downwind", but it also made sense to my brain: the back foot was across the center line on the side where I wanted to turn, and the front foot on the other side, with the toes barely touching the centerline of the board.

But not everything that seems to make sense actually does make sense. The "back foot carve" approach meant that I shifted my weight towards the back of he board. If you've foiled, you know what that will lead to: the foil will start climbing. Up I went. That meant less drag, so I also went faster. Faster means more lift, so I went up more. Positive feedback loops are fun! In this case, they also let to a wet ending.

After reproducing this three times in a row, I finally remembered that throwing all your weight onto the back foot is not such a great idea on the foil. Fortunately, there are a few windsurfing moves that requiring carving downwind on your front foot, one of them being the downwind 360 in the foot straps. Since I had worked on this move during many ABK camps, there even was a bit of muscle memory for this from my many hundred tries! The only modification I needed to add was to move my front foot a bit, so that the toes ended up on the other side of the center line.

Turning downwind his way, with even weight on the toes of both feet, did indeed keep the foil from jumping out of the water. I practiced that a bit doing S-turns, and then managed to keep decent speed through a jibe:

In this jibe, I followed the advice a couple of friends had given after my last post, and did not switch my feet at all. Switch stance with a wing felt a bit funny, but I managed to pick up a bit of speed again, and even foil for a little while before crashing. Simple jumping around to switch the feet after completing most of the turn seemed easier, so I went back to doing that.

What followed next was a lot of fun:
Of the next 14 jibes, 12 were dry, and I came out with a bit of speed left. Two of those 12 dry jibes were a bit wobbly, but in the others, I kept the board speed near or above 5 knots even in the slowest section of the jibe. A few of these jibes felt really good. In one jibe, I was foiling the entire time, although the board touched the water a little bit for perhaps a second. The minimum speed in this jibe was 8.12 knots, which is about 2-3 knots above the stall speed of the foil. It's also a knot faster than my previous best wing jibe, and a new alpha 500 PB (personal best) for winging.

It's been a little less than three months since my last session at this spot, when I got the feeling that wingfoiling could be a lot of fun for the first time. Back then, I was happy to get 8 runs in, before I was exhausted and call it a day. Today, 16 wing sessions later and in very similar conditions, I managed to get decent jibes in 12 out of 14 successive tries. For a slow learner like me, that is a rather rapid improvement! Wing foiling seems quite a bit easier than windfoiling, at least once past the initial hurdles. According to my session log, it took me 157 windfoil sessions to get a jibe as good as today's jibe (measured by the minimum jibe speed) - and that happened at Bird Island in Corpus Christi, where the water is even flatter, and after a private lesson with Andy Brandt.

Of course, I did not cleanly foil through a wing jibe yet, and repeating today's success in choppy conditions will likely take many more practice sessions. But fun and confidence are growing, so there's an increasing danger that I'll become a wingnut, too.


Sunday, October 16, 2022

Wrong Steps

 Wing jibes and tacks look sooo easy. Just watch Johnny Heineken:


But the facts that wing jibes are easy for the likes of Johnny and Nina unfortunately does not mean that they are easy for me. The GPS tracks from my last wing session tell the story:
The speeds at the bottom show that about every other turn included a full stop - that usually means a little swim. Not a single jibe was foiled through, or even close. But I was in Lewis Bay, where the chop was small and orderly, and the SE wind was steadier than in front of Kalmus beach. So why were my jibes no better than in previous sessions (if anything, they were worse)?

I was on a new wing, but I absolutely cannot put the blame on the new gear. My Duotone Unit 6.5 was an absolute pleasure to use, powerful in lulls, well behaved in gusts, and always very predictable. Instead, I might have to blame my approach to learning new things on the water: after some initial progress, I then have to discover all the possible things I can do wrong, usually by repeating them several times. That's not necessarily an approach that makes you learn things fast, or one that I can recommend for any other reason - but it's how I learn.

This time, I learned how you are not supposed to step in the wing jibe, at least not while learning on a huge beginner board in choppy water. What I wanted to do was a "toe side to heel side" jibe, where you switch the feet before you jibe so that the toes are pointing to the wind (in windsurfing, that would be a "switch jibe"). In preparation for the foot switch, I move my feet closer together, so that they are almost parallel. But then, instead of completing the foot switch, I chicken out and go straight into the jibe, planning to complete the stepping at some later point in time. Do you see where this is going? It took me a couple of sessions and maybe 20 or 30 crashes to figure this out...

The typical problem was that things got really wobbly as soon as I was near downwind, and had no more pressure in the wing. With the wing over my head, I often found myself pushed onto my heels, and then off the back of my board. It's a fun crash, with the board taking off and jumping joyfully - but it's not what I wanted to do. After all, I'm supposed to be the one having fun, not the board!

After a couple of dozen such crashes, and few more jibes here I recovered my balance through heavy wiggling (that fortunately nobody was close enough to see), and then watching Johnny Heineken start all his carves from a very wide stance in the movie above, I could no longer reject the theory that maybe, just maybe, putting the feet closely together before starting a slow carve might somehow be the cause of my crashes. What was missing was some forward-backward stability, and having the feet right next to each other is one of the worst possible stances to achieve this. So next time, I might just try to start the turn from a regular, wider stance, or perhaps even complete the stepping into a switch stance before reaching downwind.

There are a few great examples of perfect foot switches in the Johnny Heineken video above. Starting from the rather wide stance, Johnny first shifts his weight onto the back foot briefly, which makes the foil go up. He then steps forward with the back foot, right into the foot step, and then back with the old front foot. So briefly, all his weight is pretty far forward on the board, which makes the board go down again - hence the initial push on the back. It looks too easy when he does it!

Here's my current favorite wing jibe tutorial video: