Showing posts with label theory. Show all posts

Saturday, August 25, 2018

Punch the Giant's Nose

This post is not about boxing or football, sorry. It's about the loop. I like simple explanations, especially when thinking about a move that takes only a second. How many things can you think about in a second? For me, the answer is "one" - maybe two on a good day.

Some old loop instructions were simple: "Jump high and sheet in!". That actually did work for some people. But for many others, the advice resulted in "killer loop" attempts that broke gear and bones. You'll probably have a hard time finding a professional instructor who uses this advice. Broken gear and bodies are not good business.

I've been looking at loop videos a lot recently, and noticed a few things. Let's start with a picture:
This is from a Josep Pons video that I blogged about in the past. He is setting up for the loop. Note that his body is over the board, and both arms are bent, with the elbows at roughly a 90 degree angle.

Now check the next picture:
Josep is starting to take off, but the board has not yet left the water completely. The mast has moved towards the windward-forward side, and his front arm is fully extended. The back arm is still bent, but the hand is over his head.

Mr. Pons has some of the most beautiful loops in windsurfing. Lots of PWA pros line up to get lessons from him, often to work on double loops. Imitating him seems like a good idea!

The movement of the front arm is punch-like. Just imagine a giant standing on the front-right side, and Josep trying to punch his nose! The back hand also goes up; with the giant there, I guess he's protecting his head from counter punches.

The bent front arm in the first picture means that the sail is partially de-powered: bending the front arm sheets out, the same way as extending the back arm would. In the loop, the sail must be partly sheeted out at the beginning, so that the mast can be moved to forward-windward (where it is in the second picture).

Punching up helps to lift the nose of the board for lift-off. Interestingly, extending the front arm to punch the giant's nose also exposes more of the sail to the wind - it effectively sheets in. That starts to turn the nose of the board downwind, which in turn exposes even more of the sail to the wind - I call this "automatic sheet in".  This can be clearly seen if you compare picture 2 to the next picture, where the board has just left the water:
We've just punched a giant in the nose. That made the giant angry! I think it's a really good idea to make ourselves really small now, so the giant has a smaller target:
By curling up into a ball, we can rotate faster. If you've ever tried a somersault, you know that! In the process, we also pull up with the back foot, which keeps the tail of the board from going back down into the water prematurely.

If you're learning the loop and managed to first punch the giant's nose like Josep, and then curl up into a ball, you're well on the way to at least landing on your back, hopefully in a position to water start, so I won't go into what comes next - I think that's comparatively easy, if you managed to get into the position shown in the last picture above.

So, here's the really simple loop instruction:

  1. Before takeoff, get your body over the board. Sheet out by bending your front arm.
  2. As you go up the wave, punch the giant's nose. Just remember that the giant is standing on the windward-forward side of your board, and not on the nose of your board!
  3. Once in the air, pull up with the back leg and make yourself small. Enjoy the ride!
As I am writing this, I can't help but think back at the one time I actually fought a giant. Maybe "fought" is an overstatement - it was just point sparring at a Kempo Karate tournament. Maybe he was not really a giant, but he was at least a head taller than I was. The fight was over quickly. No, I did not manage to punch his nose - I had never before sparred with anyone who was a lot taller than I am, so I really had no clue. But the giant in the loop is imaginary, so he should be easier to hit, right? I won't say he does not hit back, though - I have had a few hard backslaps in earlier loop tries. Maybe it helps if I hit harder :-).

Sunday, August 5, 2018

Vulcan Theory

It's been a while. It's overdue. I must write another post about freestyle theory. There are many reasons for it:

  • It's been so hot that I want to spend as much time in the water as on the water. Freestyle is called for!
  • The ABK camp in Hyannis is coming in less than 5 weeks! (You have registered to reserve your spot, right? It often sells out!)
  •  Rumors have it there may be an ECWF-style event in Hatteras in October. Unlike the ECWF Cape Cod on September 15-16, I should be able to compete in Hatteras.
  • I've watched Nina for more than two years hacking away at the Flaka, with very slow progress. But she recently started to try Vulcans again, and progress seems a lot faster.
  • I recently tried to try Grubbys again, and was quickly rewarded with a sail-damaging catapult. I learned what the dreaded "loop crash" in the Grubby is!
So, taking everything together, there was plenty of reason to look at the Vulcan again. The final straw was when I looked at some videos on Continent Seven to check on a question that had come up from Nina's Vulcan tries - especially Yentel Caers Spock into Culo

Let me start with what I remember from previous lessons and videos about how to Vulcan:
  1. Twist your body and your feet.
  2. Move your hands into a rather uncomfortable position on the boom.
  3. Carve and S-turn, and pop the board out of the water, while at the same time flicking the boom, looking back over your shoulder, and letting go with the back hand.
  4. While most of the board is in the air, except maybe the nose, push down and pull on the boom, and move the rig around so you can grab the other side of the boom.
  5. Land sliding backwards, throwing your weight forward so you don't get ejected backwards.
  6. Sail away switch, or somehow change your feet and sail away.
All that sounds rather complicated - perhaps well suited for big-brained windsurfers, but too much to fit into my head. Then, there's the motivation issue: the Vulcan was the "must learn first" new school freestyle move, but in itself not much fun. It takes most freestylers between 200 and 1000 tries to learn; since I learn tricks a lot slower than others, my number would likely be in the several-thousands. Are we really surprised that I stopped after playing around with just popping the boards a bit? That I looked for alternative "first" moves like the Flaka and the Grubby? Even the loop has gotten more tries on the water, despite the fact that I try loops only once in a blue moon.

But now let's look at a screen shot from Yentel's Spock (for those not familiar with freestyle: the Vulcan is the first part of the Spock; you remember that Spock was half Vulcan, right?). Here it is:
This is just as Yentel takes off. Note that his front hand is close to the harness lines; his front arm is extended; and the sail is sheeted in (check the movie if you want to verify this). This is actually how most instructions for the Grubby start! Having the sail forward and powered after takeoff makes the nose of the board turn downwind, and starts the board rotation. Then, when the nose is in the water, it creates a rotation point, and the momentum of the board makes it turn around all the way to a backwards slide. 

In contrast to what we see in the picture above, most Vulcan instructions focus on turning the board with the body. That includes pre-twisting feet and body; looking back; and pulling and kicking the board around with your feet. All that "active board movement" happens while you also switch hands on the boom, and move the rig around so you can grip the other side! Did I say "complicated"?

Part of the confusion comes from the fact that the Vulcan can be done in different ways. It is perfectly possible to rotate the board with your legs and body. It's also possible to start the board rotation by pulling the mast backwards, and pushing down on the boom; or with "sail forward" pressure, similar to the loop, like Yentel appears to be doing.

Let's look at Yentel half a second or so later:

The nose of the board has touched the water. The board has rotated about 45 degrees. Yentel is leaning to the inside (away from us), and the board is tilted so that the leeward edge is closer to the water. The front arm is still long, and the tip of the mast is over the nose of the board. At this point, the weight of the rig is pushing the nose of the board into the water, supported by Yentel pulling up with his back leg. One more picture a bit later:
At this point, the board has turned 180 degrees (which is as far as it needs to turn for the Vulcan). Yentel's head is over the mast foot, and all his weight is over his front foot and on his arms to keep the nose of the board in the water, allowing the board to slide backwards. 

"So what?", you ask? Let me explain! 

In the first picture, Yentel starts the board rotation with sail steering, similar to what many Grubby instructions suggest. I've tried that a bunch of times. Most of the time, I held back, and got just a little rotation, with the nose of the board under water for just a fraction of a second. But the one time I really committed, I got a lot of pull in the sail, and got catapulted very nicely. The sail hit the water so hard that a top panel ripped just from hitting the water. My neck was sore for a couple of days. So there's definitely enough power for a rotation that can be generated this way! I know at least 4 people who actually learned to loop while trying to do a Grubby this way. For me, though, the idea of letting go with the back hand to avoid the catapult seems like a great idea,

In the middle picture, Yentel uses the weight of the rig, pushed forward by his extended front arm, to get the nose of the board into the water. In many of Nina's Flaka tries, and in my few Grubby tries, getting the nose into the water briefly was easy, but keeping it in the water was very hard. The common advice is to "lean forward" or to use "more commitment", but that's very hard to do. Using the weight of the rig on an extended front arm seems a lot easier. It's even similar to what you can do in a jibe to keep the board from bouncing! But perhaps the more relevant tidbit is that Nina reports that she had her best Vulcan tries when she acted on a tip to keep her front arm long and forward during Vulcan attempts.

From all this, a simpler approach to the Vulcan emerges:
  • Sail on a beam reach with decent speed and power
  • Widen the grip a bit by moving both hands
  • Pop the board while extending the sail arm forward and pulling in with the back arm
  • Let go with the back hand, pull up with the back leg
  • Keep the front arm long and lean "into the turn" as the board slides around
  • Extend the back leg, bend the front leg to keep your weight forward for the backwards slide. Grab the mast (or go directly to the new side on the boom).
  • Get both hands on the boom on the new side, pull down on the boom to stabilize, sheet in, and sail away switch (or switch your feet to sail away normally).
I don't have a clue if these instructions really work, but at the very least, they are simple enough to fit inside my head. I've done some similar things in the past, and the differences make complete sense ("let go with the back hand when the pressure gets too much") or are quite natural ("grab mast and boom so you can sail away"), so chances are pretty good that I'll actually try this. Maybe I'll just try a few until I have crashes that discourage me. Or maybe I'll have to try this a thousand times before I make a Vulcan, but as hot as temperatures are these days, crashing a thousand times seems like fun. 

Sunday, July 24, 2016

Dead Toys and Lots of Noise

This is a two-part post. If you're a geek, keep reading to the end. If you just want an update about how things were recently, by all means stop after the first part.

Last Friday had looked so promising in the forecast: wind all day, with mid-20s in the afternoon! Sunny and warm! But it started badly enough, by giving me the finger - a blue finger:

I am still thinking I should sue Chinook for failing to put a warning label on their booms that reads "Remove fingers before closing". Fortunately, it's been too windy to find a lawyer. There's no fun to be had in court rooms!

Briefly, here are the other things that happened:
  • My GoPro broke. Dead. Kaputt. 
  • When the chop and crowds became unpleasant in front, I sailed to Lewis Bay on my Skate 110/Idol 5.6 combo, and loved the flat water I found. Came back to switch to slalom gear and drag Chris along. Had an absolutely crazy, overpowered, out-of-control ride through nasty chop to make it back to Egg Island - the wind had picked up to averages above 30. Chris promptly declared Lewis Bay as "absolutely unsailable" and sailed back, leaving me alone. Considering that I had barely made it there, I had doubts that I'd make it back, so I stayed. At least there were no crowds. But there was the security guard now posted at Egg Island that makes sure nobody but birds set foot there. 
  • My Android phone that I use to announce my speeds through GPSLogit got wet and broke. This was the first time I had not double-bagged it, and also the first time I did not close the waterproof bag properly. It's terminally dead. Drying did not revive it. 

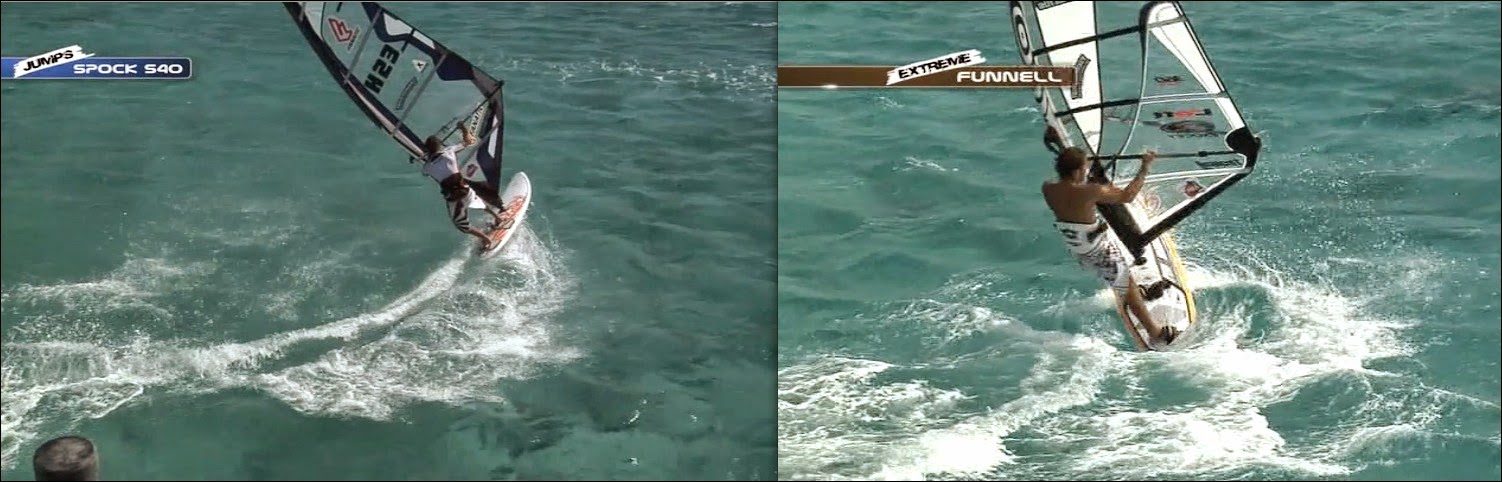
So, here's a pop quiz: what do I call a day of sailing like that? Think about it for a minute. I'll even post a picture to create some distance from the answer.

The answer is (of course): A great day of sailing!

In the morning, I had a few hours of freestyle on what I count as a small sail. I even made one or two wet Upwind 360s - the "Andy Brandt" variety, where you leave the sail forward when you carve, and backwind before loosing all speed. Still had to waterstart out of it, but getting closer.

In the afternoon, I was eventually joined at Egg Island by my lovely wife, who was nicely powered on 3.7. That made me feel a bit better about thinking that my 5.8 was a tad big, especially since the wind had dropped by then. I watched here hack away at the Flaka, with a few good tries. She now has tried Flakas on sails from 3.7 to 5.6 m .. impressive. I still think she'll get her first Flaka before the Cape Cod ABK camp in September.

I did not try anything, but practicing slalom sailing was fun, and I later got some perfectly flat spots for full-speed jibes - so cool! I ended the day with a final session on my 3S 96 with my Idol 5.0 in front, bumping and jumping. 125 kilometers of fun! Who would complain about a blue thumb and a couple of broken toys?

But I wanted to replace the GPSLogit phone, and picked up a Samsung Galaxy J1 for $30 at the local Best Buy. First order of business was checking how well it would work in comparison to the "standard" GPS units.


Warning: here begins the geeky part of the post. Continue reading at your own risk!
So I taped the phone and two Locosys GPS units to the dash board of our Nissan NV 2500 high roof van, and took the babies for a ride. The GPSLogit speech announcement worked as expected, and the speeds always agreed well with the speedometer. I even stopped in the middle to switch the GW-52 from 5 Hz recording to 1 Hz recording, just to see what happened.

Let's start by comparing the phone data with the GT-31 data. Here's a part of the doppler speed graph (click on the image for a large view):
GT31 (blue) vs. Samsung Galaxy J1 with GPSLogit (red)
The first impression was "pretty good", but a few small spikes are visible in the phone data. Here's an enlarged section:
The red phone data are a bit noisier, and have a few spikes that may overstate the speed by a knot or two. Indeed, the speed results in the GPS Team Challenge categories showed that the phone speeds were a bit higher than the GT-31 and GW-52 speeds (up to about 1/2 knot) - something that was seen before for other phones. But while the accuracy is not good enough for posting to the GPS Team Challenge, it's definitely good enough to hear how fast you are going while you're sailing. Great!

When I compared speed results from the GT-31 and the GW-52, the differences were minimal, as expected. However, there was a very noticeable difference in the 5 Hz data from the GW-52, compared the the 1 Hz data from the GT-31:
1 Hz GT-31 data (blue) compared to 5 Hz GW-52 data (red)
The GW-52 were collected every 0.2 seconds, so we have five times as many data points as for the GT-31 data which were collected every full second. The GW-52 data have a lot more spikes - little ups and downs. That had been reported by others before for windsurfing data, and the question arose whether these spikes are real differences in speed, or noise that was caused by the higher measurement rates. We'll get back to that question in a minute, but let's look at a comparison when the GW-52 unit is set to 1 Hz:
1 Hz GPS data from GT-31 (blue) and GW-52 (red) 
The data look very similar. 

So, let's have a closer look at the 5 Hz data. There are valid arguments that can be made why collecting data at a higher frequency is better. If (a) the errors in the speed measurement are purely random, and (b) the error per data point is the same at 1 Hz and at 5 Hz, then measuring at 5 Hz would give about 2.2-fold higher accuracy. But this is only true if both of these conditions are met.

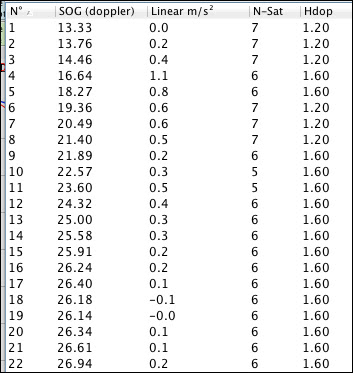
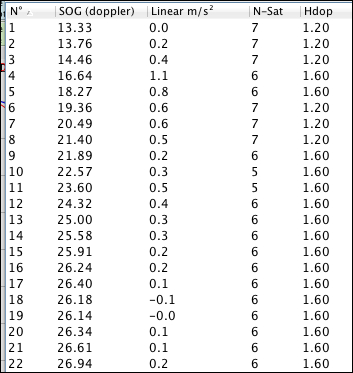
Let's look at the data points (I used GPS Action Replay's "Trackpoint Table" to create the screen shots):
GW52 "raw" 5 Hz data from a small subregion
For comparison, here at GT-31 data from the same region:

GT-31 data (1 Hz)
A picture says more than 100 words, so here is the doppler speed graph for this region:
1 Hz GT-31data (blue) and 5 Hz GW-52 data (red)
When we seen spikes like in the red curve about in windsurf data, we may believe that they are real: we constantly hit chop, gusts, and lulls, and it seems quite possible that our speed changes several times within a second. But the data above are not from windsurfing, but from driving a big, heavy van.  The Nissan NV2500 High Roof van is quite a beast. It weighs in at about 3 tons (6250 lb), and we've loaded it up with interior racks, 6 boards, 15 sails, masts, booms, etc. Does it change speeds several times a second like the GW-52 data indicate? Allow me to cite from The Princess Bride:
"Inconceivable!"

We can get a bit more formal in analyzing this. We can start by looking at the acceleration - the change in speed from data point to data point. The acceleration is shown in the tables above as "Linear m/s2". In the GT-31 data, the values change little from data point to data point; but in the GW-52 data, the acceleration jumps from 0.4 to 2.9 in 200 milliseconds! That's almost no acceleration to 1/3 g. I'm sorry, but I don't drive that crazy!

The change in acceleration is actually a pretty good indicator of noise in the data. It's pretty easy to calculate, and if you're mathematically inclined, you can call it the second derivative (the acceleration being the first derivative of the speed). Here's a graph of the acceleration and noise for GW-52 data:
For comparison, here is what this looks like for the GT-31 data:
That's a lot less noise in the G-31 data! The 1 Hz data do reflect reality better: I accelerated somewhat evenly over about 15 seconds, kept the speed more or less constant for about 1/2 minute, and then slowed down constantly.

This is some rather clear evidence that collecting GPS data at higher frequencies does indeed introduce addition measurement error, which negates any potential advantages of the additional data points at least partially. More data is just that - more data. It's not automatically better data. Nor does a lower error number that some software spits out necessarily mean that the data are indeed more accurate - if basic underlying assumptions are invalid, then the error numbers will also be invalid.
--
Some of my readers may wonder: "Who are you that you think you can analyze this, and go against what everyone else says?". Well, that is a valid question. I admit that windsurfing is my primary addiction, but I have some scientific background. I got a M.S. in Biophysical Chemistry, a Ph.D. in Experimental Sciences, and have worked in scientific data analysis and software development for Bioinformatics for last 3 decades. I certainly enjoy developing algorithms for large-scale (and small-scale) data analysis... especially when it's not windy. 

Saturday, March 21, 2015

The Fear Factor

My winter posts about learning new school freestyle tricks tend to be heretic. I refuse to follow the common belief that "Thou shalt learn the Vulcan as the first new school move!". Of course, I get a lot of flak for these posts. But that's not all bad - at least, it tells me that someone ir reading my blog. And fortunately, burning heretics on a stake is not in fashion anymore.

It does not matter that my non-conformist thoughts usually are provoked by statements from experienced freestylers. Nor does it matter that there are some examples that the "crazy" theories are right. The "Flaka before Vulcan" theory worked great for Graham, who's gone on to much harder tricks since then, still ignoring Vulcans and Spocks from what I have heard. But in the eyes of many, that does not prove anything.

I found myself starting a lengthy answer to Pete's comments to my recent post where I had dared to suggest to learn the Funnel and/or Switch Kono before the Vulcan. Pete makes valid points, and unlike me, he knows what he's talking about because he's done it on the water. So I figured a response would need to be very lengthy, and follow a two-pronged approach:
  1. Invoke a higher authority. That always seems appropriate in religious battles. 
  2. Explain the relevance of a feeling that Pete probably does not know: fear.
To get started, let me show you a brief video that introduces my "higher authority":

That's Andy Brandt, coming in with style in Bonaire. The first time I saw the movie, I thought that was one of the coolest tricks I had ever seen. Here's another example where he uses it to turn around in a lull:

I have also seen Andy do Reverse Duck Jibes live, and I still think it's one of the coolest tricks out there. So cool that it took me a long time to imagine I could learn to do it...

Of course, Andy never suggested to learn the Funnel before the Vulcan. However, he has suggested to try the Switch Kono with a 360 entry (sometime called the Kaino), and he has demonstrated the move - another wicked cool move. I have actually tried the Kaino a few dozen times. I never got close to landing one, but I have managed to get the board into the air, and to turn upwind enough while falling backwards to get wind into the sail from the right side again. So the Switch Kono seems doable - except that I seem to loose too much speed in the 360 entry.

Another thing that Andy made me try is jibing in the straps, flipping the sail without switching the feet, and planing out switch. I have tried that, too, a number of times, and got to the point where I can pick up a little bit of speed again when planing switch on the new side. Not enough to plane at full speed, but enough to know that planing switch in the straps is nothing to be afraid of.

Which brings us to the Fear Factor. If not for the Fear Factor, we'd see a lot of windsurfers throwing spin loops - everyone agrees that it's easier than a planing jibe. The loop is also a very cool-looking move, and supposedly a lot of fun to do. But at the spots where I usually sail, maybe one out of 20 to 50 windsurfers will ever throw a loop - and that's counting only windsurfers with a decent jibe. The rest is mostly to afraid to ever try; a few (like me) will try occasionally, but are too afraid to commit.

For moves like the Vulcan, the Fear Factor also gets in the way. The moves and crashes don't look quite as scary as the loop, and there is nothing scary about just popping the board, so the first baby steps are easy. But sooner or later, commitment to turning the board around in the air is required, and crashes in the footstraps will result. Those who overcome their fear quickly learn that they won't die, and that the crashes (usually) look worse than they feel. But others stop here, saying "maybe next session". My lovely wife never shows any fear of crashing; when learning the planing Duck Tack, she'd practice in 30+ mph wind, crashing 50 times in a row. When good conditions to work on the Vulcan came up during out Texas trip, she popped the board out of the water just fine; but fear kept her from committing to letting go of the rig in the air, and turning the board around.

So why is the Fear Factor so much smaller when going down the Switch-Duck road towards the Funnel / Switch Kono? There are several reason:
  • Going switch can be approached in several non-threatening ways, which include light wind practice, on-land practice, and not switching feet after jibing. This will sometimes lead to crashes, but those crashes are not that different from, say, a blown jibe.
  • Ducking the sail can  be approached in several non-threatening ways. IMO, learning the duck from switch requires some simulator training on the beach ("sail chi"), and then learning the light wind duck tack. 
  • Backwinded crashes are harmless. Before considering the Duck Tack or Funnel, you should learn the planing Carve 360. Unless you are super-human, you will get flattened by a backwinded sail many times while learning, and you'll learn that this is a harmless and fun crash. I am a big chicken, taking just about any excuse to not work on any tricks; but I will try 360s, even when it's really windy, because I know the crashes are harmless.
  • It's worth doing even without the jump. So maybe going down the Switch-Duck road will let you learn the Funnel and Switch Kono, or maybe not. It does not matter much - even if you never pop the board from a backwinded switch stance, you still have mastered the most difficult part of two very cool tricks, the Reverse Duck Jibe and the planing Duck Tack. Seeing Andy do the Reverse Duck Jibe started all this - and the Reverse Duck Jibe also teaches you carving a jibe on the heels, something you can then apply for planing backwind jibes.
What? I convinced you that perhaps there might be something to this theory, at least for some windsurfers with big inner chickens? Well, here's a step-by-step plan for going down the Switch-Duck road.

Step 1: Prerequisites. If you omit these, later steps will be a lot harder.
  1. Sail chi on the beach. You have to be good at luffing the sail from the clew. An hour spend on the beach can save many hours on the water.
  2. Sail switch and backwinded in light wind. Sailing in switch stance and sailing backwinded (or lee side) are basic skills that anyone who came up through ABK camps will have learned. If you have not, it's time to go out and practice. It's much easier to learn in light wind on a big board and small sail than in planing conditions!
  3. Light wind Duck Tack. Learn the Duck Tack in light wind on a big board and a small sail. I mean a really big board and a really small sail - like a 200 liter sailable SUP and a 4.7 m sail for guys. It's a pretty hard trick, but it's also one of the coolest light-wind moves.
  4. Carve 360s. Start with planing downwind 360s out of the footstraps. It's not absolutely essential that you get them, but you should at least get close.
Step 2: Play time. These steps are optional, but helpful.
  1. Jibe without foot switch. Do a regular jibe or duck jibe and flip the sail, but do not switch your feet. Instead, keep sailing on the new reach in switch stance, and try to pick up speed again.
  2. Strap jibe without foot switch. Very similar to step 1, but do not take your back foot out of the strap. Sail as long as you can, then either switch feet or fall backwards.
  3. Carve 360 in the straps. Staying in the straps for a Carve 360 requires that you keep your weight more forward, both when initiating the carve and at the exit. The move requires good power and is a lot easier on flat water.
  4. Kaino crash. Start a Carve 360 in the straps. After the board turns to the new tack and the sail starts to get backwinded, let the sail push you up and backwards while flaring the nose of the board as high as you can. Push the nose towards the wind to get wind into the right side of the sail again. Unless you have a ton of speed on flat water or a wave that pushes you, the chances of actually making a Kaino are very slim. But the crash looks cool and is a lot of fun.
Step 3: Switch planing.
  1. Practice on land. Put a board on a lawn or a sandy beach, and practice switching your feet, like Phil from getwindsurfing.com showed on his instruction video.
  2. Switch on the water. Go sailing, and switch your feet while planing. You may want to try the different approaches that I had described in my previous post to see which one works best for you. 
  3. Keep your speed and direction. Keep practicing the foot switch and planing in switch stance. The goal is to keep your speed up. Keep power in the sail while and after switching your feet, and see how far you can go without going to deep downwind.
Step 4: Ducking the sail. I hope the water is warm! You will crash. A lot.
  1. Duck going downwind. Duck the sail after switching your feet while going slightly downwind. If you kept your speed, going downwind a bit should reduce the apparent wind to levels that are not much higher than during your light wind duck tack practice.  Try to keep the duck quick, not as floaty as Andy did in the videos above. Sail a couple of seconds backwinded, then crash or start on working an exit.
  2. Duck on a beam reach. Try ducking the sail on a beam reach, or even going slightly upwind. This will make the Duck Tack exit easier, and will give you more power for jumps. But you'll also have more apparent wind.
  3. Sail backwinded. Practice sailing in control after ducking the sail. See how far you can go. It seems the pro level freestylers can sail in this position forever!
Step 5: Old school exits. These are optional - go on straight to new school if you like. 
  1. Reverse Duck Jibe. Just copy what Andy does in the videos above :-). But it you did a less "floaty" sail duck, you can keep more speed and even plane out. This part is identical to the ending of the backwind jibe. If can already do backwind jibes, it should be easy; if not, learning backwind jibes should be easier after you mastered the Reverse Duck Jibe.
  2. Duck Tack. Carve upwind instead of downwind to end this as a tack. You will stop planing, so this is identical to the light wind version. 
Step 6: New school exits: Funnel and Switch Kono
  1. Do the Fu. If you pop the board and turn the nose downwind, you'll start a Funnel. But a Funnel is a 540 degree turn - you add a 360 after jumping the board around 180 degrees. When starting out, you don't have to add the 360 - just jump the board 180 degrees, and then sail away. This is the equivalent of a Vulcan, but you're in regular stance here, so sailing away should be easier. Nobody else does it that way, but that's because everyone else has learned the Vulcan first, and then the Spock and Spock 540, so they are already good at sliding backwards through more turns. I don't know what this move is called, but since it's the first 1/3rd of the Funnel, we'll take the first 1/3 of the name, too, and call it the Fu.
  2. Funnel. After you recovered from the initial shock that you managed to jump the board around and were able to sail away from it, it's time to learn sliding backwards. Then, add a 360 turn. Check the videos how to do this, I don't really have a clue.
  3. Switch Kono. If you played around with the Kaino crash in step 2 above, you may have a pretty good idea what to do. I really don't so I'll leave this for another post in the future.
--
Maybe I wrote this entire post mainly for myself. The approach above does not make any sense for the typical new school freestyler - a young, wild, and most likely blond windsurfer hell-bend on jumping, and without any fear. I'm an older guy, closer to 60 than to 50, with much better light wind freestyle than high wind freestyle, even though I sail much more in high wind than in light winds. I may have managed to keep my gut from expanding too much in the past three decades, but my inner chicken definitely has grown - grown to a size that may be incomprehensible to a 25-year old. But when I look around at an ABK camp, I often see other guys of a similar age, with similar skill sets, and (presumably) similar familiarity of the Fear Factor. So perhaps this post might prove useful to someone else, after all.

Saturday, March 14, 2015

Backwind Jumps

The title of this post is misleading. This post is really an illustration how careful one has to be about what one writes on the internet. You never know what kind of ideas you put in peoples heads!

Regular readers of this blog may have noticed that I have not posted my typical crazy theories about freestyle moves this winter. Some may even have hoped that they'd make it through this winter without being exposed to yet-another freestyle theory that is obviously completely wrong. Hah - zu früh gefreut! Here is my new theory:
  • For some freestylers, the first "new school" freestyle move should be not be a Vulcan, Grubby, or Flaka, but rather a backwinded move: a Shaka, Switch Kono, or Funnel. 
A few of my back-and-forth-sailing friends may now wonder what the hell I am talking about, so let me show you a video of a Funnel:


How could I possibly think that's the first new school move to learn? I'll blame tim319. On a thread about learning the Flaka on the British windsurfing forum, he posted this:
"I think I'm gonna crack funnells in much less time.
Apparently as soon as you start to get them you make the majority."
Interesting enough to prompt a few Google searches. Very quickly, they turned up this statement by Flo Söhnchen, a top German freestyler:
"Der Funnel ist eigentlich relativ einfach" (The Funnel is actually relatively simple)
That is quite a contrast about what he writes about one of my previous favorites, the Flaka:
"Durchhalten! Irgendwann klappt das verdammte Ding! :)" (Keep at it - you'll get the damn move eventually!)
And about the Grubby:
"Irgendwie find ich es recht schwierig, den Move richtig konstant hinzubekommen" (Somehow, I find it quite difficult to make this move really consistently)
Now back to what Flo says about the Funnel:
"Was den Move schwierig macht, ist das Duck-Schiften des Segels in der Switch-Stance-Position vor dem Absprung." (What makes the move difficult is ducking the sail from switch stance before the pop)
So, if you already know how to duck the sail while planing switch, the move should be easy! Admittedly, this is a difficult skill - I have read that it is more difficult than learning the Vulcan. But I know at least two women who learned the planing Duck Tack before the Vulcan - my lovely wife Nina, and Marji from Bonaire. There are a couple good reasons to learn the planing Duck Tack before starting with new school tricks. One is that is has a light-wind counterpart, which can be quite helpful to learn the sail handling (which is, indeed, non-trivial); the other one is that the crashes look a lot less dramatic than Vulcan crashes. The light-wind Duck Tack is also a move that can be done in almost-planing conditions, and with a high success rate once you learned it - two things that install confidence.

So, if we assume a windsurfer can do the planing Duck Tack, and that she can plane switch in the straps, is the Funnel really a good move to try? That still seems highly questionable for the following reason:
  • Looking at just the board movements, the Funnel is the equivalent of a Spock 540: the nose is jumped downwind to turn the board 180 degrees into a backwards slide, followed by an additional 360 turn while sliding
  • The Spock 540 is the trick you learn after the Spock, which you learn after the Vulcan; many who have learned them all say that it takes just as many tries to learn the Spock as it took to learn the Vulcan.

It it wasn't rainy and cold outside, I might just stop here, and ignore what tim319 and Floh said (and perhaps remember that so far, I have had quite limited success planing switch, and never even tried a planing Duck Tack, although I have the non-planing version down). But it is rainy, so we'll continue by carving the moves into little pieces, and comparing them.

1. Preparation

For the Spock 540, there is not much to do - get over the board for a pop, instead of staying more out like you would for a chop hop. Easy enough to do.
For the Funnel, you have to go switch stance, and then duck the sail, without loosing to much speed. Definitely much harder!

2. Take off

In the Spock, the sail is upright and depowered. That's quite different from chop hops, where the sail is to windward and powered. 
In the Funnel, the sail is backwinded and slightly forward. The pressure in the backwinded sail helps to get air. If you don't jump, the backwinded sail will throw you backwards - but if you've worked on 360s, you know that these crashes are harmless and often even fun.

3. In the air 

In the Spock 540, we have to let go of the backhand, and switch hands to the other side of the boom. We also want to push the nose down to create a rotation point. That's a lot of things at the same time, while the board is in the air - one of the things that make learning the Vulcan (the first phase of the Spock) hard.
In the Funnel, we have held on the the boom the entire time - not so hard.

4. Sliding backwards

We have turned the board 180 degrees, so our stance has switched: in the Spock, we are now switch stance, while in the Funnel, we are regular stance.  If you stop the Spock here, you have a Vulcan. You could stop the Funnel here, too, but nobody seems to do that. If you did, you could sail away in a regular stance, rather than from a switch stance as in the Vulcan. The sail now needs to go towards the nose of the board to continue the rotation. This seems easier in the Funnel, where we are in normal stance, and more difficult in the Spock 540, where we are switch stance.

5. After turning 360 degrees

We are backwinded and sliding. In the Spock 540, the body is twisted up - relative to the regular backwinded stance, we are in switch stance. In the Funnel, the stance is almost identical to the stance before takeoff, except that the sail is still more forward to push the nose around for the final half-turn.

6. Exit
In the Spock 540, the sailor exits in switch stance; in the Funnel, the exit is in normal stance.

In summary, the Funnel does seem quite a bit easier after the initial preparation, since we do not have to switch hands on the boom mid-air, and are in a normal stance through the entire rest of the move. So perhaps we can believe tim319 and Floh!

I am not claiming that the Funnel is much easier to learn than the Spock 540. It's possible that it is actually more difficult; after all, the Tricktionary 2 still had it listed in the "Extreme" section. However, it appears that the hardest part of the Funnel happens before takeoff. This part can be learned without any jumping or popping! Since the crazy crashes that we see when guys try to learn Vulcans and Spocks are eliminated, the fear factor is greatly reduced.

Additional motivation to learn the planing Duck Tack and the switch duck in the straps is that it leads to the Switch Kono. If you've ever seen Kiri Thode or Tonky Frans throw a sky-high Kono on perfectly flat water in Bonaire, you'll agree that this is a very cool looking move. Perhaps more importantly, it is the only new-school move that does not scare me at all, for a very simple reason; when working on Carve 360s in the straps, I got thrown backwards by the backwinded sail many, many times. Some of those times, most of the board was in the air, and I got the nose turned enough to get a bit of wind into the sail again from the right side. In the worst case, those falls were harmless; typically, they were a lot of fun, even if it was windy enough that I'd stop doing duck jibes.

So, I got two tricks I'd love to try, the Switch Kono and the Funnel. To get there, I'll probably first need to catch up with Nina a bit, and finally work on the planing Duck Tack. So that gives a couple of high wind goals for the upcoming ABK camp in Hatteras: 
  1. Planing switch in the straps
  2. Ducking the sail while planing switch
There. I said it. Now I have to do it. Then we'll see what that leads to. Maybe I'll throw in a few Shove It/Shaka tries while we're down there - after all, they are backwinded jumps, too. 

Wednesday, February 5, 2014

10 Reasons to learn the Grubby

It's the coldest time of the year - lots of snow, but not much opportunity to windsurf. So the mind games start... even more so since the annual trip to the warm Caribbean waters is coming up. Nina says this is the year that we need to learn new school freestyle - pop, slide and spin instead of just back and forth. Perhaps I agree with her. Or maybe I'll remain in my old mental state - the  "lawn-mowing chicken".

I don't want to remain a chicken. I need motivation. Here's the move I'm thinking about:


It's the Grubby. I need motivation to try it. So here are 10 reasons to try the Grubby:
  1. The Grubby is one of the easiest new school moves.
  2. You don't need to switch hands or feet.
  3. It looks cool.
  4. It can be planed through.
  5. You can do it when you're just barely planing (as Danielle and Maxime show).
  6. Crashes hurt less than Loop or Vulcan crashes, because you're always holding on to the sail.
  7. You can add a jibe at the end for a really cool, fully planing turn.
  8. Fellow blogger Fish has been doing Grubbies for 10 years.
  9. When Andy Brandt tried to do Grubbies, he ended up looping. That's a perfectly acceptable outcome.
  10. I blogged about it again - time to do it!
I like steps to measure progress. The Vulcan makes this difficult, since you need to pop, turn, and flip the sail, all within less than one second. To complicated for my simple mind. Here are steps for the Grubby:
  1. Pop the board, fin nicely out of the water.
  2. Push the nose down to create a rotation point.
  3. Turn the board 90º downwind. Try doing that by sheeting in at take off. 
  4. Turn the board 180º.
  5. Keep the weight forward so that the board slides backwards.
  6. Push out with the sail hand, let the mast hand come in, to complete the rotation.
  7. Sail away dry.
  8. Plane through.
  9. Add a jibe, sail duck, or downwind 360 at the end.
The only part I've done before was step 1, but it's been a while (chop hops are different!). I'll be quite happy if I make it to step 5. Maybe I'll spend some time on step 3, trying to get a feeling for different ways of turning the board. I think that some new school moves primarily use sail steering, while others rely more on twisting and unwinding the body to rotate the board while in the air. Playing around a bit with this may be worth the effort. For all those crashes, Tobago has a definitive advantage over Bonaire: much less sand in the board shorts afterwards, since the water is deeper! But it will be just as warm and sunny :-).

Sunday, August 18, 2013

Why I want to learn the Kono

I am a lawnmower sailor - back and forth, back and forth. I put on a GPS and call it "speedsurfing", but you only need to look at my speeds to see that's just an illusion. Only when the winds are too light to plane do I do freestyle. Ok, I love light wind freestyle. I sometimes even do a little bit of freestyle in high wind. I never really committed to learning new school tricks, though. Now I think I want to learn the Switch Kono:
Kiri Thode mid-Kono in Bonaire
Here are my reasons:
  1. It's one of the coolest looking new school moves. In Bonaire, I have often been absolutely amazed how much air Kiri, Taty, Tonky, and the other pros get in Konos.
  2. Tricktionary states "As soon as you learned how to duck the sail properly it is not that difficult".
  3. Andy Brandt says you do not have to duck the sail! You just start a downwind 360. With enough speed, you end up switch stance backwinded after turning through downwind.
I had almost forgotten Andy's statement until I tried 360s a couple of days ago. In one of the wet tries, I fell backwards, and the board shot up in the air, as if I was doing a jump jibe. That's when it occurred to me - hey, is that not similar to the 360 entry into the Kono? Looking at the Kono in the Tricktionary quickly confirmed that.

This got me excited. My favorite trick is the jump jibe:
I love the way you kick the board vertically in the air. I also love that you are allowed to fall into the water, as long as you get the clew first waterstart to get going again. I do it sometimes just for fun, or when space is tight, and have a reasonably good success rate. Now look at this movie of a Switch Kono:

Ignore that he enters the regular way, going switch and then ducking the sail. You can also get into the position he has 5 seconds into the movie by doing a downwind 360 in the straps. Then, it looks like the sail is powering up and pushing him backwards. That's a very typical fall when learning the 360! The difference here is that he also jumps the board:
The board is almost vertical, but barely out of the water, and the sailor is falling towards the water. Very similar to a jump jibe!

There are, of course, some important differences which I don't fully understand yet. In a jump jibe, we kick the tail of the board through the wind; in a Kono, the nose turns through the wind.  I'm not even sure if the sail is actually powering up backwinded, or if this is more of a neutral slicing of the sail. But there are a few important things here:
  • The entry is very similar to a trick I already do (I mean the downwind 360 entry; I can do light wind duck tacks, but not planing switch ducks).
  • Jumping the board is very similar to a trick I already do (the jump/fall jibe)
  • The falls while working on the move seem very safe: they are either similar to typical 360 falls, or you are hanging under the sail and falling backwards into the water.
All this reduces the "entry barrier" to trying to learn a new trick. The typical first new school move is the Vulcan, but the Vulcan has very high entry barriers. Right away, you need to learn (1) how to pop the board, (2) how to initiate the 180 degree rotation, and (3) how to flip the sail right after takeoff. That's a lot of things to learn! Watching those who learn the Vulcan, the crashes seem sometimes quite violent. Why spend hundreds or thousands of tries on something where the end product is not even that cool? A Kono looks 100 times cooler than a Vulcan. At least one freestyler has reported that he got the Switch Kono during the first session that he tried - but he clearly had quite excellent skills and already knew how to go switch and duck the sail. 

I am not saying that learning the Switch Kono as the first new school freestyle trick is for everyone. The traditional entry (go switch and duck) is not easy, perhaps even harder to learn than the Vulcan. The 360 entry may be a bit easier if you already worked a lot on the 360, as I have. But it is imperative that you turn through downwind on a plane, which requires very good entry speed, good carving speed, and enough wind. Here, for once, my obsession with speedsurfing and perfecting my jibes works in my favor - I can often carry plenty of speed through a turn. Nevertheless, working on this at Kalmus will be a bit a challenge: as soon as the wind gets strong enough, the chop builds up, which makes it a lot harder to carry speed through downwind. But it's only two more weeks until the summer season is over and all flat water strips are available again, and just three more weeks until the ABK clinic in Hyannis. For once, I know exactly what I want to work on if we get enough wind!
--
A few hours after writing this post, I found a couple of references to this move. Royn Bartholdi describes it on his move pages here. He is using the Gorge waves to keep the speed up through the carve. A discussion on the UK boards forum points out that Robby Naish was probably the first one to do this move in the waves, years before Kiri got credit for inventing the Kono (but Kiri does it on flat water, and starting switch and ducking the sail). Robby can be seen doing this trick at about 3:20 in this video. Then in 2009, Kai Lenny "invented" the move again, and in all modesty called it the "Kaino". I think I'll stick with 360 into Kono, though. I like the pointers about using waves or swell to keep the speed up. Seems like the move to try on a SSW day in Kalmus near low tide!

Tuesday, January 15, 2013

Analyzing the Flaka

Our annual trip to Bonaire is getting closer, so we have started to think about freestyle moves we want to work on. There are still a number of old school tricks to learn, and the loop still beckons, but it also is time to work on new school tricks. In a previous post, I have explained why I thought that the Flaka might be a better first new school move than the Vulcan. At least one young windsurfer I know has indeed learned the Flaka first, and in a relatively short time; but other freestylers had a much harder time with the Flaka than with the Vulcan.

Before I go into any more details, let me show you a Flaka very similar to the one I saw in Bonaire a few years ago which started this whole thought process. This is a short part of the "Girls in Bonaire by Kuma Movie" video:
Two things peaked my interest:
  • It is obvious that the move is very similar to an upwind 360, which can be practiced in light wind
  • The difference is that it starts with a small jump (or rather pop), but as the video shows, turning the board about 45 degrees in the air is sufficient. 
But looking at this movie and other Flaka movies also shows some subtleties that may explain what can make the Flaka a hard move to learn. For the rest of this discussion, I will focus on the first half of the move, until the board is sliding backwards. The second part is identical to the second part of an upwind 360, and therefore should be reasonably easy to do if you have a solid upwind 360.

At least for Flakas with a small initial hop (less than 180 degrees), there are several changes in how the board is railed during the move. The Flaka is typically initiated with a downwind carve, just like a jibe entry, so we pressure is on the toes. For the takeoff, the board is flat:
In this example, the board is back in the water after turning only about 45 degrees:
The tail of the board needs to slide towards downwind, so the weight must be on the heels - otherwise, the toe-side rail would catch, resulting in a crash onto the sail. The "heel-side rail down" can be seen even better on the next picture:
The board continues to slide around until it has turned 180 degrees:
Note that the sailor's weight has moved towards the nose of the board. The back leg is straight, the front leg bent:
Now, the board is relatively flat. The sail is about to be backwinded. Everyone who has ever taken an ABK camp knows that the sail pressure needs to be on the toes for backwinding, and that's what we see:
The board is now angled so that the heel-side rail is up. The sail is backwinded and pushed towards the nose, so it wants to push the nose around. In an upwind 360, we would now move the weight onto the back foot to move the waterline, and this seems to be exactly the same in the Flaka:
In this example, the weight shift may be a bit more than necessary, so she over-rotates a bit. But you can see exactly the same shifts in this movie where Daida Moreno does a very nice Flaka.

To summarize, the Flaka as shown above includes the following weight shifts:
  • toe-side  =>  flat  =>  heel side  =>  flat  =>  toe side
  • weight centered over the board  =>  weight towards nose  =>  weight on back foot
So, there seems to be a lot more going on than one might think at first glance. If you watch Flakas from some of the top guys, some of the elements above may not be visible. That's partly because they often jump the board a full 180 degrees before it hits the water again, so the initial heel-side slide is not present. But I think many windsurfers learning this move will start with jumps that are significantly less than 180 degrees, and therefore need some heel-side slide. 

The entire thing about the rail setting was brought to my attention by my lively wife, and is based on what she heard in a Flaka discussion with ABK Boardsport's Brendon. It makes perfect sense to me after working on 360s a few times in "pesky" winds (around 15 mph), where exact technique is essential. However, I have not seen it mentioned much in Flaka lectures or discussions.

I think the rail-to-rail dynamics may explain the problems that some freestylers who can Vulcan have when learning the Flaka. Unlike the Flaka, which can be done with a relatively small initial jump, the Vulcan pretty much requires a 180 degree jump. While both moves do include a backward slide, the move mechanics otherwise are very different, and learning one move first may actually make learning the other move harder.

There is one more thing that has fascinated me about the Flaka: the similarity of the first half of the Flaka with the jibe. That may sound crazy, since the jibe is a downwind turn and the Flaka start in an upwind jump, so let me explain with some pictures:
On the left side, we have Anders Bringdal entering a step jibe; on the right is Daida Moreno entering a Flaka. They both start carving downwind, getting the sail depowered and behind them, and have the head on front of the mast. There are some differences because Anders is on slalom gear in a lot more wind, but I ask you to ignore these and focus on the similarities.

This is a bit further into the moves. We can see that the boards are starting to point into different directions, but the sail and body positions are pretty similar, with the sail in front of the body, and the shoulders more or less square to the sail. 
A bit further into both moves, we again see both sails in the same position, with the mast towards the viewer. Anders is about to rotate the sail, Daida is about to get backwinded to finish the rotation. Even though Anders is looking forward and Daida is looking to the back, their body positions are similar. The original back foot is now in front, and the shoulders are pretty square to the sail.

From the pictures above, we can conclude that the first half of the Flaka is very similar to a jibe! Except for the jump/pop, sail and body move in a very similar fashion in both moves. The obvious difference is that the feet remain in the straps for the Flaka. So to rotate the body by 180 degrees, and have the old back foot go to the front, we have to pop the board out of the water. Then, instead of stepping forward, we rotate the body 180 degrees, taking the board with is. I this this analogy gets even more amusing when we think about the Flaka 180 instead of the Flaka. In the Flaka 180, the sail is flipped like in a heli tack while sliding backward, and we start sailing back into the direction from where we came. So the Flaka 180 is really the upwind equivalent to the downwind Vulcan. It can be also seen as a heli tack that starts with a jump-turn. And based on the above, that's very similar to a jibe :-)

Tuesday, June 21, 2011

The Flaka entry

We have 50 days of windsurfing everyday on Maui coming up soon - so it's time to think about things to learn. A recent blog post by the Canadian Guy certainly encourages thinking a lot about moves before trying them. He got his first Vulcan in 155 attempts, compared to more typical counts in the 300-1000+ range. He studied plenty of how-to-articles as well as blog and forum posts to prepare for the move. Understanding and visualizing the move probably helped him cut out a few hundred tries.

One move I'd like to try during the next 2 months is the Flaka. Some windsurfers have a hard time learning the Flaka, but others think it's easier to learn than the Vulcan. A few things that I find attractive about it are:

  1. I've seen Flaka being completed after a tiny little 45-90 degree jump.
  2. Compared to the Vulcan, there's a lot less to do - the hands remain on the boom the entire time.
  3. The Flaka is a natural progression from the upwind 360s, which can be learned in light wind and then practiced in high wind. The only things to add are the initial jump, and the slide.
However, I have one big problem with the Flaka theory: I do not believe the explanation that my favorite windsurfing teacher gives about the mechanics of the move. I think his "quadrant" theories are great for the spin loop and the Vulcan. However, if my memory serves me right, he also thinks that the initial sail throw for the Flaka is into the forward-leeward quadrant, and that mast base pressure makes the board turn upwind. 

I looked at the Tricktionary videos, and at least 15 other videos of Flakas in many variations - regular, one-handed, air flakas, and double flakas (mostly at continentseven.com). In all of the videos I looked at, the initial sail throw is to the windward side, typical into the forward quadrant. Here are screen shots from 4 of these videos:
The videos are showing Daida MorenoSarah-Quita OffringaDavy Scheffers, and Piotr Konkel just as the boards are about to leave the water. In each case, the mast is tilted to the windward side, not to the leeward side. The mast remains there while the board is starting to turn, and the nose is coming down:


Note that between the first and second pictures, the boards have turned about 45-90 degrees. This turn cannot be caused by mast base pressure - any mast base pressure would turn the board the other way, away from the wind. Instead, what appears to be causing the board rotation is the "unwinding" of the body, from the shoulder down to the hips and eventually to the feet:

 
In the third series of pictures, the boards have rotated 180 degrees, and the back legs that were bent in the middle picture are straight again. Now, backwinded sail steering is taking over to push the nose of the board around the rest of the way.

Here's an animated picture series from Daida's Flaka, where the initial oversheeting to (a) depower the sail, and (b) pre-wind the body, can be seen nicely. After the oversheet, watch her body twist the other way, from the hands down to the hips and finally the feet:
So, according to this analysis, the Flaka is a two-part move: in the first part, the board is turned by twisting the body, with the sail basically being neutral; in the second part, the board is steered around the rest of the turn with backwinded sail pressure. This switch, together with the considerable commitment required for the first part, may explain why the Flaka can be hard to learn (especially if you have not done your light-wind homework :).

Saturday, April 23, 2011

Remko + Andy + Jem = Loop?

It's getting warmer, and the ABK Camp in Corpus Christi is just 5 days away, so it's time to start thinking about the forward loop again. During the ABK freestyle camp in Bonaire in January, 4 or 5 of us went for the loop, but none of us succeeded. A typical attempt would be as follows:
  • a couple of bounces/pops where the board would get out of the water nicely (especially during the first bounce)
  • a third bounce where the board would barely leave the water
  • going for the loop by throwing the rig forward-leeward while the board was going back down towards the water
  • the board sticking to the water, and the surfer being pulled out of the straps and catapulted around the board
On the upside, nobody got hurt, and no equipment got damaged - but I could not shake the feeling that something was missing. A nice regular wave might have helped, but everyone who tried had no problems popping/chop hopping the board so that the fin was totally free, so at least one of us should have been able to waterstart out of a try. Still, I had the impression that my limited jumping/popping skills were a problem. So I was quite happy to see Jem Hall's forward loop video: he first focuses on jumping "with your tail up", and then adds a tail grab with the back hand as a loop pre-exercise. Below, I am taking Jem's suggestions, and combine them with parts of Andy Brandt's  and Remko de Weerd's loop lectures. I'll illustrate some points with frames from Jem's video. This is intended for average (or perhaps slow-learning) windsurfers like myself, who have a primary emphasis on not getting injured while learning new tricks like the loop.

Skill 1: tail-up, small-surfer jumps
The picture below shows what needs to be done:
Note that the tail of the board is higher than the nose, and that Jem has made himself very small; in some of the examples on his video, you can see that he almost hits his chin with his back knee. The front leg is more extended, and pushes the nose downwind.

 Skill 1a: tail grab jumps
While jumping, grab the tail of the board with your back hand:
The only way to grab the tail of your board is my really pulling your back leg up and making yourself small. Without a tail grab, you may be much more extended than you think in the air, but if you can grab the tail, you're fine.


Skill 2: Sail steering / falling in a jibe / Wymaroo
This is an exercise for light winds (non-planing conditions). It's "Step 1" in Remko's 4-step approach, and Andy's first crash. Here's Jem doing this:
The idea is to put the mast very far to windward in a pivot jibe, and to fall to the windward side while constantly pushing the board downwind with the mast foot (look at the mast angle above). In Remko's video, he does this going up a wave, so that the nose of the board is in the air. However, at most places, you won't have a wave that comes up against the wind. What Andy has added here is that you kick the tail of the board to lift the nose up; if you do this right, you can turn all the way around, ready to waterstart again. This is a fun and perfectly harmless exercise.

Skill 3: Putting it together
When you put the first two skills together, you should be very close to a loop. Look at Jem at the start of a loop:

Look how far to windward his mast is tilted. His backhand is all the way back on the boom. The mast foot pressure is starting to push the nose of the board downwind.
This is a fraction of a second later. Jem is getting small, and looking back. The board has already turned about 90 degrees downwind, and by now, the pressure in the sail is catapulting him around.
Close to the end of the loop, it looks like Jem is about to land on his back in the water. He's starting to get taller again, and to push the sail up. I'll be perfectly happy when I land on my back on this position the first time!
  ---
I find the progression of the how-to-loop lectures very interesting. The oldest suggestions I have seen are "just do it", and that obviously worked for some gifted folks. But it did not work for everyone, and I know several windsurfers who suffered season-ending injuries when trying things this way. Remko's approach tried to minimize the injury risks, and I think it did - but it does not work well without a perfect wave (I know, I broke the nose of my board trying to go from the non-planing to the planing version in flat water). Andy added the tail kick to Remko's version, which definitely helps keeping the boards intact. His current loop lecture got many more timid windsurfers like me to try the loop. Adding the jump exercises from Jem's video should help a few of us to complete the loop. It's also an exercise that's perfectly suited for the video sessions in ABK Camps - the jumps look cool, and some windsurfers may discover that they have to get a lot smaller still. The shallow water and lack of waves at many ABK Camp locations may make completing the first loop a bit harder, but that's no excuse for not trying...