Recently, my lovely winging wife almost cut the size of here foil in half: she switched from a 1250 square centimeter foil to one with 680 square centimeters. She goes out on the much smaller foil in the same conditions - when my wind meter shows 10 knots on the beach, she'll be on her 4.2. In the past, she'd switch down from her 1250 to a 725 square centimeter foil when the wind was strong and the chop/swell high, but that's a thing of the past: the new 680 foil is all she uses, in 10 or 25 knots, flat water or big swell. She's also having more fun, which sometimes is very obvious by much longer wave rides while flagging the wing.
It is pretty obvious that the new foil is a lot better - but why? The new 680 is a "high aspect" foil, but so was her old 725, which did not work nearly as well in lighter conditions, so that can't be it. But a closer look at the foils shows some large difference in the foil shape. I grabbed my contour gage and measures the foil profiles near the center of the foils. Here's what the old 1250 looks like:
And here's the new 680:
While the 1250 is a pretty standard, nearly symmetrical foil shape, the 680 looks very different: only the top section is curved, while the bottom section is very flat (easy to verify by just putting a ruler on the foil surfaces). If you often think about fluid dynamic force diagrams, you'll probably say it's obvious that the lower shape is a lot more efficient - but seriously, who thinks about fluid dynamic force diagrams?
Well, let's look at a pressure diagram for an asymetrical airfoil (from this tutorial):
The blue section above the foil shows an area of low pressure that the foil shape generates. That low pressure basically sucks the foil upwards - it's the lift that the foil generates. Now if you would create the same image for a symmetrical foil instead, you'd also have an identical blue low-pressure area below the foil. A symmetrical foil does not create any lift if it goes through the water at a straight angle - it can only create lift if it is tilted so the front edge is higher than the rear. That's call a positive "angle of attack". At an angle of attack of 0 degrees, a symmetrical foil only creates drag, while an asymmetrical foil creates lift. Things change when we go to a positive angle of attack, but I get the suspicion that the "bulge" on the lower side is counter-productive even then.
Intuition is one thing - but can we find support for the theory that foils with a flat bottom are better? How about we check on http://airfoiltools.com/, a public database that has profile and drag and lift data for 1638 different foil shapes?
Let's start looking at a "classical" symmetrical foil, the NACA 0015:
First, we can check how the lift the foil generates depends on the angle of attack:
No lift at 0 degrees, and then a steady linear rise to about 10 degrees, before the lift curve flattens out. Of course, the drag also increases at higher angles of attack:
If we look at the ratio of lift to drag, we get the "glide" a foil has at different angles of attack:
This particular foil is most efficient at and angle of attach of about 8 degrees. Past this angle, the drag increases faster than the lift, and the foil becomes less efficient.
Now let's look at a asymmetrical foil for comparison. I picked a more or less random one that has a bottom that's almost flat:
It's not exactly the same as the 680, but close enough for this discussion. Here's the lift vs. angle of attack graph:
Unlike the symmetrical foil, this foil generates lift at a 0 degree angle of attack - almost 30% of the maximum lift it can generate. Here's the drag curve:
And the lift-to-drag ratio ("glide"):
The angle of maximum glide is close to 5 degrees, lower than for the symmetrical foil. But more importantly, the maximum lift-to-drag ratio is about 150. The symmetrical foil we looked at had only "glide factor" of about 78 - roughly half of what the asymmetrical foil had. Q.E.D.
--
Of course, this analysis is simplifying things a lot. There are lots of things we are completely ignoring - drag from mast, fuselage, and stabilizer; the effect of water turbulences; the fact that the foil is a 3-D shape, not just a constant 2-D profile; differences in thickness and actual shape; and more. But we have seen some good theoretical evidence that "flat bottom foils" can be more efficient than more classical, symmetrical shapes. For wing foiling, we have seen a somewhat similar reduction in drag from board shapes that are longer and narrower. I believe that a few years from now, the "classical" foil and board shapes will be mostly replaced by more efficient shapes. Personally, I can't wait for my brand to go and copy the profile of my wife's new 680 foil.
It's been 4 months since my last post about wing jibes, so it's time for a progress report. In this time, I have winged about 30 times, with more than half of these sessions in Florida last months. One thing that briefly set me back a bit was switching from Starboard foils to Axis foils. My new HPS 1050 front wing has a lot more glide than the Starboard Supercruiser and Wave foils, so for a few sessions, I was constantly overfoiling in the middle of jibes. On the less efficient Starboard foils, turning of power during the jibe required shifting more and more weight to the back - something I had apparently automated well. On the higher aspect Axis foil, the weight shift was not necessary at all, so when I did shift my weight unconsciously, the foil climbed up out of the water. It took a few sessions to break the old habits, and stop overfoiling in jibes.
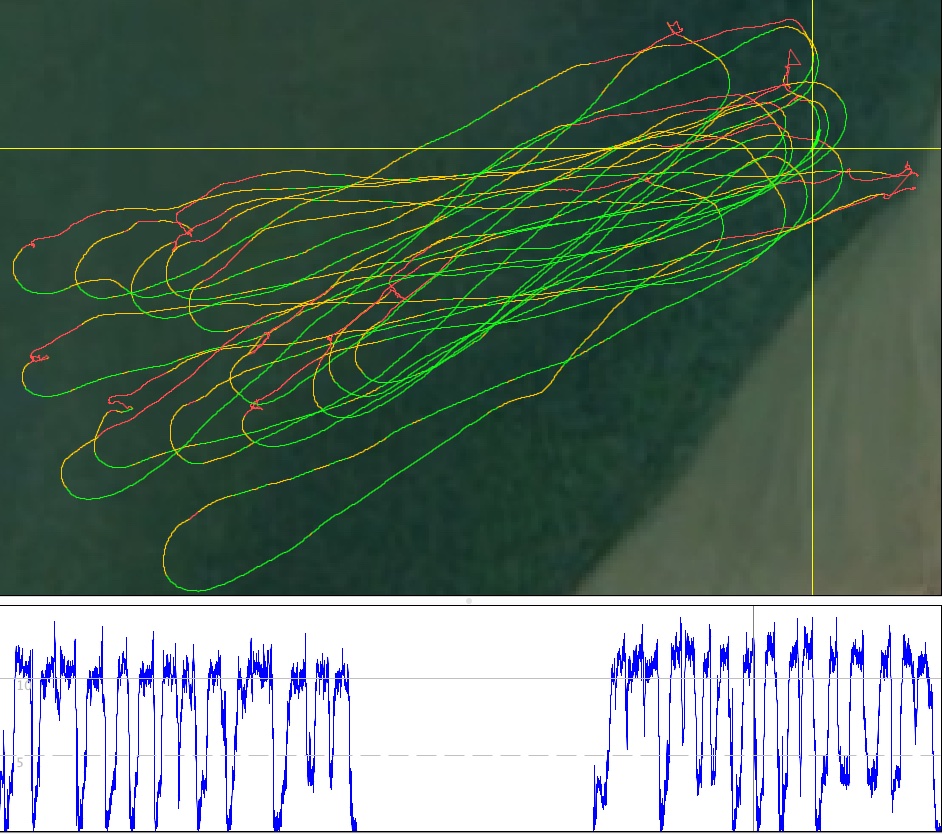
Several things happened after that which helped me to finally make more rapid progress. Before I go into these, let me show you some GPS tracks from the first hour of a session I had 2 days ago:
Check out the speed graph at the bottom: it never drops down to zero, which means I never crashed. That's 29 dry jibes in a row:
In about 1/3rd of the jibes, my speed never dropped below 5 knots, meaning they included just a brief touchdown, after which I was able to pop right back up on the foil. This may not be impressive compared to good wingers, but it's a huge change for me. A month ago, I would have crashed somewhere around 90% of these jibes!
Before the session above, I had a few of sessions in Florida with even better jibes (judged by minimum speed and percentage of speed kept during the jibe), but I still crashed every few jibes.
Here are three things that helped me get to an hour of winging without crashing:
Switching to a larger tail wing. Based on forum advice from someone who also had had a hard time learning to jibe, I replaced my 400 Speed stabilizer with a 500 freeride stab. The effect was dramatic - the board became much steadier than before, giving my slow self time to react when that was necessary. Finally, the board was not reacting twice as fast as I was anymore!
Practicing gliding. On the same forum thread, someone had posted a video from Alan Cadiz with instructions how to learn to glide while winging. Pretty basic stuff, but perfect for me.
Switching back to my wide, long Fanatic Stingray 140. This is the board that I had some of my best jibe success on many months ago, before I switched to the Starboard 115 wing board. The initial hope was that the extra width and volume would make it a lot easier to recover from mistakes, like slightly wrong foot placement, without crashing. That certainly is the case - but another benefit of the long, heavy board is that it again slows things down. My "dry rate" immediately went up a lot when I switched to the Stingray. Another benefit is that the board just keeps planing in touchdowns, where the shorter 115 l board tends to loose a lot of speed. That makes popping right back up on the foil after a touchdown and foot switch much easier.
I also switched to a longer mast (82 cm instead of 75 cm), but that made just a small difference. In fact, the session above was with a 75 cm mast, albeit on very flat water.
Encouraged by the "dry wing hour", I decided to switch back to the 115 l wing board yesterday. The wind meter readings were a few knots higher, and stronger wind often had helped me in jibes. Alas, things did not go quite as planned. Here are the tracks:
No fewer than 5 of the first 6 jibe attempts ended in crashes! However, there were a few things that contributed to the crashes in addition to the board chance: the wind was more southerly and stronger, so we now had some closely spaced chop; and I had forgotten my booties, which I always use when foiling, and being barefoot was quite distracting for the first half hour. Of 13 jibe tries, only 5 were dry, and just 2 were halfway decent. Eventually, I got the suspicion that I was perhaps a bit overpowered, and went in to switch from the 6 m wind down to the 5 m wing.
That turned out to be a much better size for the wind. It's also helped that I had completely forgotten that winging barefoot is not something I usually do, and had stopped worrying about hitting the fin or something nasty on the ground with my bare feet. Of the 15 jibe attempts in the next half hour, 9 were dry, and 4 were halfway decent. I even switched my feet in the air once or twice, rather than waiting for the board to touch down first.
One peculiar thing about yesterday's session was that it was slow. My top speed was about 1.5 knots slower than most days, and even the mighty, never-crashing Nina was a couple of knots slower than usual. Our best guess is that the closely spaced chop just disturbed the water so much that it slowed us down significantly. But if we're lucky, we'll get a nice northwesterly tomorrow that's strong enough for a slalom session, and will go at more than twice of yesterday's speed in really flat water.
Wing jibes are great. Some talented wingers learn to foil through their jibes within 10 sessions, and soon after foil through virtually all of their jibes. I recently saw a picture from a session where a winger foiled through 400 jibes in a row - his playground was less than 100 meters wide, so he had to jibe several times a minute. Many "average" wingers learn wing jibes in about 50 sessions, or in their first season winging.
But there are also quite a few wingers who struggle with the jibe. Unfortunately, I am in this group - after close to 100 wing sessions, the majority of my jibe attempts still end up with a crash. It is not for lack of trying - you have to turn around at some point, anyway, so I've probably crashed a couple of thousand jibe tries by now. Something new is needed.
A wing jibe lecture by Andy Brandt at the recent ABK camp in Hyannis gave me a few pointers of what to change, and there were a few small improvements when trying to implement his tips. But one problem I have is that his lecture was about 30 minutes long, and that there are many things that I should be doing differently within the 10 or 15 seconds that a jibe takes. Major brain overload alert! After a crash, I'm now better at diagnosing what I did wrong - but I still crash.
In search of a quick fix for my problems on Youtube, I discovered a new-to-me video that gave me a few new ideas. Here it is (with most of what interests me in the first few minutes):
What rang a bell for me was to divide the jibe into different parts, and the suggestion of specific drills for the different parts. The jibe parts are:
Preparation
Carving 180 degrees
Hand switch
Sailing toeside
Foot switch
If you watched the video above, you may notice that I added the first and the last point. The first point, preparation, is quite trivial, but in the past, I had quite a few wrong ideas about this which I'll explain below. The last part, the foot switch, may seem optional to wingers who come from kiting or prone surfing, but it is something that most windsurfers will want to do.
The video suggests to do drills for individual parts of the jibe separately, and that is what I want to expand on here. In every other sport that I have done in my life, a complex new move pattern was always broken down into parts, and the parts were taught and learned individually, and then put together. One example are katas in karate - you learn one piece, and move on to the next piece once you have the first piece down; typically, it takes a few lessons to learn a new kata.
Another element that comes into play is what skills are needed for a given step. For example, to learn a helicopter tack in windsurfing, you first need to learn leeside sailing, and then positioning and slicing the sail for a sail flip. For a nicely controlled heli tack, you should also have mastered clew-first sailing, so that you can arrest the move before the final flip. In the words of ABK's Coach Ned, you need to have the "basics" down. So we'll look at what skills we need for the different parts of a wing jibe, and what drills can help us to learn these skills.
1. Preparation
In the windsurf jibe, preparation is quite important, and the chance of planing through a jibe without proper preparation is low. But for winging, things are easier: you basically need to foil in control, and at a reasonable speed and height - things we do most of the time, anyway. The only thing that is required before starting the turn is that the front hand is switched to an under grip (assuming you used a regular grip before).
Moving the feet before the jibe is typically not necessary. It can help to put the feet a bit closer together, since this can make it easier to switch the feet at the end of the jibe, without disturbing the flight by taking large steps. So a useful skill to practice is to sail with the feet closer together.
If you are coming from windsurfing or windfoiling, it is important to realize that you do not need to step to the leeside of the board with your back foot for the carve - actually, stepping to the edge of the board can be quite a bad idea. Here is why: if you place the back foot to the outside, and your front foot is near the centerline, then your board will start to turn downwind even if you have similar weight on both feet. As your board turns, the centrifugal force from the turn will want to through you off the board. At the start of the turn, when you still have power in the wing, you may not notice this - but soon after you let go of the back hand, you will be off balance, and then fall to the back. Those can be fun crashes, with the board shooting out of the water as you topple backwards - but they are still crashes.
2. Turning (carving) 180 degrees
Changing direction by 180 degrees is what the jibe is really about - everything else, like hand and foot switches, is just stuff we need to do as a consequence. So it makes perfect sense to practice just turning 180 degrees in isolation. When you learn jibes, you will fall, anyway, so why not plan to fall after turning 180 degrees? Lemons to lemonade - we are turning a frustrating jibe crash into a successfully completed drill!
There are a number of skills that we are working on in this drill:
carving by bending the knees and leaning into the turn
maintaining an even turn radius
foiling with a flagged wing - let go of the back handle and ignore the wing completely
regulating flight height in the turn, without wing pressure
staying oriented during the turn
looking to where we are turning
What happens when the turn is completed does not matter. Regardless of whether the board touches down, you fall off, you jump off, or you turn back, you were working on multiple skills needed for the wing jibe. It's may even be a good idea to keep turning further to see how far you can turn before running out of speed.
One very important thing, though, is that you are absolutely not allowed to look for the handles, or try to grab the back handle again before you have completed the turn. One of the common beginner mistakes is that they want to minimize time without power in the wing, and turn to look where the handles to grab are. The "180 carve drill" teaches to instead look where you are going, and stay in control without the crutch of wing power.
One real fun way to practice 180 degree turns is to play with swell or chop, turning downwind to go down a swell, and using the energy of the wave to stay foiling. This can be tons of fun and really help with getting the jibe quickly, but there is one caveat: you should turn far enough, well past downwind. If you're a crash-averse winger (I am), you may be tempted to go down the swell just a bit, and the quickly turn back and grab the back handle again to get that nice stabilizing wing power again. But if you do that, you're actually practicing bad habits: to rely on the wing for balance, and to be way too eager to grab the handles again as soon as possible. So turn further, and forget about the wing!
3. The hand switch
The tutorial video above has some great examples of jibes done by experts, advanced wingers, and jibe beginners. If you look at the differences between the jibe beginners and the better jibers, a few things stand out: experts typically complete the turn before they hold on with both hands again, and never look for the handles; in contrast, the beginners try to get both hands back onto the wing as quickly as possible, and often look for where the handles (or booms) are, which causes all kinds of wobbling. Furthermore, the beginners often end up with the wing high above their heads, held with an extended front arm pointing straight up. Most wingers in the video bend their knees a lot for the turn, but one the experts maintain this throughout the turn; the beginners often end up with straight legs at the end, and it almost looks like the wing is pulling them up and stretching them out. If you are a struggling want-to-be wing jiber like me, you know this feeling, and you also know that it is often followed by a dismount to the back.
As the video suggests, a great drill to practice the hand work (and the next step, sailing toeside) is to do so on the beach. In the span of 10 minutes, you can practice the hand switch many times on both sides, whereas on the water, you'd likely crash and have to restart, and get just a few tries in.
For the hand switch drill, we now pick up at the end of the previous drill: we have turned 180 degrees, so that our body (and toes) is now pointing to the wind, and are holding the wing near the front with our previous front hand, with the arm to the side and a little to the back. Now:
Look in the direction that you want to sail to (right angle to the wind)
With your free hand, point into the direction you want to sail to
Move the hand that is holding the wing to the other hand. Keep looking where you are going, do not look for the handles (or boom)!
Grab the front handle with your new front hand, and let go of the old front hand.
DO NOT LOOK FOR THE BACK HANDLE! If you're tried jibes before, it is quite likely that you developed the habit to do this - but that just increases the changes of messing up your jibe. Instead, keep looking where you are going.
Take your new back hand (the hand that just let go of the front handle) and put it behind your back. Leave it there for a few seconds, while you double-check that you look where you are going.
Now put grab the back handle, without looking for it.
Make sure your front arm is extended in the direction you want to go, and that your front hand is at about eye to forehead level. Sheet in with your back arm to get some power in the wing, with the back elbow pointing up. The power in the wing should pull you forward, onto your front foot. If you find yourself getting pushed onto your heels, check the height of your front hand (forehead level) and your back elbow (pulled up).
Play around with the power in the wing for a short while. Then switch hands on the front handle, and start over. Repeat at least 10 times.
Step 6 in the list above is optional - it is only there to break the desperate desire to grab the back handle as quickly as possible. So you can leave it out after the first few tries, when you are sure that you don't turn your head to look for it.
4. Sailing toeside (switch)
After turning 180 degrees without switching our feet, we are now standing with our toes pointing to the wind - toeside in kiter jargon, or switch in windsurfer terms. Many kiters are used to never switching their feet, so they keep this stance after a jibe until the next turn, and some windsurfers do the same, since they find it easier that switching the feet. But even wingers who prefer to switch their feet after a jibe need to learn how to wing in toeside stance, staying in control for at least long enough to adjust ride height and find a good spot to switch their feet.
This is also something that can easily be practiced on land, and actually is the last step in the hand switch drill described above. If you're at a flat water spot and have a stable wing board, you can also practice this with the board on the water (taxiing).
The first attempts to wing in switch stance after a jibe will likely end in a crash after a few seconds. Practice makes perfect! One way to get more time to practice switch is to let the board touch down gently, then switch the feet (see next section), and keep going with the board on the water or after popping back up on the foil. Again, this is easier with on flat water and with a stable board.
5. The foot switch
Switching the feet to get back to a regular (heel side) stance while foiling can be a bit scary and crash prone. Most expert wingers will switch feet by first stepping forward with the back foot, and then stepping back with the old front foot. But windsurfers have the opposite pattern deeply engrained in their muscle memory: stepping back with the old front foot first, then stepping forward. For winging, this creates a problem: with the entire body weight on the back of the board, the nose shoots up, and the foil wants to pop out of the water, leading to a certain crash. To avoid the overfoiling when stepping back with the front foot, Andy Brandt teaches a couple of modifications: taking half steps, and stepping by "collapsing" rather than pushing off - an entirely new skill.
There is a third option for the foot switch: switching both feet at the same time by hopping around. Some wing jibe tutorial suggest that this is easiest for many beginner, and I did indeed find this easy. But the drawback is that it is harder to place the feet correctly, and misplaced feet often cause a crash. One thing that reduced this problem is to have the feet closer together before the hop - something already mentioned as a drill in the "preparation" step. Winging in a narrower stance can also make the two other foot switch options easier, since the resulting smaller steps affect the board trim and height less.
After a number of sessions, I finally managed to break my old habit of stepping back with old front foot first, and instead first stepped forward with the old back foot, and then back with the old front foot. The "back foot first" stepping fits the "chicken" approach of letting the board touch down onto the water during the foot switch quite well, and one could possibly see this as a drill on the way to a proper foiling foot switch. To foil through, advanced wingers typically have the foil come up high out of the water before stepping forward, which drives the foil down, and then stepping back with the old front foot, which brings the foil back up.
The foot switch is also something that can be practiced on land, for example at the end of the drill described for the hand switch. This should support "automating" the wing handling during the step: first moving the wing high (into "coasting" position), and then sheeting in slightly to put some body weight onto the wing. Having less weight on the board makes the steps lighter and reduces the effect on board trim and height, similar to what we also try to accomplish be putting the feet closer together.
Drill summary
Here's a list of the drills for particular jibe parts and skills from the sections above:
Wing with your feet close together, and equal weight on both feet.
Carve 180 degrees (or more), flagging and ignoring the wing but managing height and carving evenly. Crash and call it a success, or turn back.
Carve S-turns, flagging the wing and turning past downwind.
Practice the hand switch on land. Focus on moving the wing without looking at it.
Practice toe side wing handling on land.
Toe side taxiing (flat water, big board).
Touch down gently, switch feel, continue toe side (taxiing or foiling).
Practice the foot switch on land (and after taxiing, drill #5).
How to learn the wing jibe in 10 sessions
One thing that has puzzled me for a long time is why my lovely wife managed to learn wing jibes in about 10 sessions, while I am still struggling after almost 100 sessions. Sure, she is a bit talented and learns faster, but that usually means she learns stuff twice or three times faster than I do, not 10 or ore times. But looking at the skills and drills described above sheds some light on this. In the first or second session that she got on the foil with a wing, she started playing with swell, flagging the wing, and having a blast doing S-turns. Having a wing that was relatively large for her, but well match with the swell speed, may have helped. After doing this for a few sessions, turning 180 degrees was no big deal. All that flagging the wing, and not grabbing it again until there were no more waves to play with, was good practice for the hand switch.
For the next parts, sailing switch and switching the feet, the planing and non-planing freestyle she had done in previous years paid off. She often practiced on her 89 l board, even in light wind, which requires precise stepping and weight distribution, and good balance. So she ended up practicing skills required for the wing foil jibe years before winging even became a thing - and was rewarded by very quickly getting amazing at wing foiling. I don't think I have a chance of ever getting close to her level - but I'd be perfectly happy just to get good at foiling jibes, and hopefully, the drills above will help.
I just release a new version of GPS Speedreader which has a couple of new tools to analyze sessions: turn analysis and sorted speed graphs. This post gives a few examples of how to use these functions.
Let's start with the sorted speed graph - here is an example:
The y axis shows speed (in knots). The vertical lines correspond to 10%, 20%, 30%, and so on. So in this example, my speed was below 10 knots for about 80% of the time, and above 10 knots only 20% of the time. In other words, I spend most of my time slogging and waiting for wind. That's also obvious in the colored tracks and the speed graph for this session:
One of those days where the wind started out marginal and then dropped ... but it was fun in the gusts.
The sorted speed graph is quite useful to compare two sessions or parts of sessions. Here is an example:
His top speed in the session was only 1.5 knots faster than my top speed, so better top speed is not the main reason. If we go towards the left side of the graph, the difference get larger. In the middle, which shows our medium speed, Kato was about 3 knots faster. But the biggest differences are in the slowest 20 percent, on the left side of the graph. Kato spent only about 10 percent of his time getting up to speed (26 knots of more); in contrast, I spent about 20 percent of my time accelerating. To some extend, this is because I jibed more often: 30 times, compared to Kato's 23 times. But this is just a smaller part of the difference; the bigger part was that Kato's jibes were better, and that he accelerated faster after the jibes. I know that I am often am a bit slow getting back up to speed in jibes; I remember a set of slalom races in Hatteras where I had better straight line speed than the two guys who placed in front of me, but at every jibe mark, I'd see them pull away. So that's something I would need to work on to improve my hour.
But why was Kato's speed in the main section of the graph higher than mine? The obvious answer is that he has mad skills, while my skills are more mediocre, but that does not give hints on how to improve. But since I happened to sail at the same spot when Kato did his hour, we can compare sail sizes: I was on 6.2, and Kato on 6.6 - basically a sail size larger. I remember this day very clearly, since it was the first (and only) time I sailed faster than 40 knots (41.4 knots/2 seconds). Obviously, I was well powered on my 6.2! But Kato, whom I remember as being a bit lighter than I am, was on a bigger sail, which allowed him to sail and accelerate faster. So a concrete goal towards improving my long distance speed numbers is to get more comfortable with larger sail sizes. That is something that I have done over recent years, at least on flat water, but there clearly is room for further improvements.
Now let's get back to the jibes. The new version of GPS Speedreader has a "Turn analysis" function that lets us take a closer look at jibes and tacks in a session. Here are my jibes during my 1 hour PB (as always, click on the image for a larger version):
For comparison, here are Kato's jibes:
To analyze jibes (and tacks), Speedreader looks for the center of a turn, and then examines the 50 meters before and after the turn. The first number to look at is the "Min. speed" column, which shows the minimum speed for the entire jibe. We both messed up one jibe, which shows up with a minimum speed below 1 knot. All my other jibes were above 5 knots, and in about half of my jibes, I maintained a speed of about 10 knots. But Kato kept a minimum speed of more than 11 knots in all of his dry jibes! In his best jibe, he was almost 5 knots faster than I was in my best jibe. So again, there is a lot of room for improvement for me! (To be picky: my GPS data were recorded at 5 Hz, while Kato's data were recorded at 1 Hz, which results in about 1 knot higher minimum speeds; the difference may even be a bit larger due to filtering in the GT31 he used. But even after taking this into account, his jibes were a lot better than mine. Also note that the jibe analysis methods work better with 5 Hz or 10 Hz data, and the program missed 3 of Kato's jibes - but those were just as good as the rest).
One difference between Kato's and my jibes shown in the tables above is the width. Most of my jibes were about 50-60 meters wide, while many of Kato's jibes were 70 or more meters wide. Looking at the tracks, Kato usually went slightly downwind for a bit longer before the jibe than I did; this is reflected in the higher entry speeds. But he also consistently kept at least 40% of his entry speed through the entire jibe, which I managed to do only in my best jibes. It looks like I have to go back to Oz for more jibe practice on flat water!
One of the reasons I added jibe analysis to GPS Speedreader is that I'd like to track my progress on wing jibes using GPS data. Learning wing jibes has been surprisingly hard for me, and I still have a lot to learn. So I'll show the jibe results from my lovely wife instead, who has been nailing wing jibes for a few years already:
If you compare the "% speed kept" column to the numbers for Kato's fin jibes, you can see she kept more than 70% of speed while wingfoiling, whereas most fin numbers are in below 50%. Keeping speed with the "motor off" is much easier when foiling than when windsurfing!
There are a couple of things to keep in mind when looking at the turn analysis in GPS Speedreader. First, keep in mind that turn analysis is new, and will sometimes give wrong results. A jibe may be characterized as a tack, or vice versa; may be missed by Speedreader; or what not really be a jibe or tack. Low frequency and less accurate (e.g. watch) GPS data are expected to have more problems, but some errors will also occur with accurate 5 or 10 Hz data. Hopefully, this will get better in future version, as the algorithms get refined with more data.
Turn analysis requires that the wind direction is accurate. While Speedreader can often deduct the correct wind direction from the GPS data, this can be quite hard with some foil data. For example, if you always tack, foil through the tacks, and never jibe, it's likely that GPS Speedreader will have the wind direction wrong by 180 degrees. At other times, the error may be 90 degrees, or just a few degrees. For turn analysis, it's always a good idea to check the wind direction in the polar plot, and adjust it by hand if necessary.
I've been windsurfing for more than 30 years, although this includes several multi-year periods where I did not windsurf at all. I got really hooked again a few years ago, after getting married to my lovely windsurfing wife, and starting to take ABK clinics. ABK also introduced us to windfoiling, which then led to winging. We mainly wing and windsurf on Cape Cod, with regular trips to places all over the world.