My friend Spencer had a little problem with his board:
Thanks to Kalmus chop, it had developed a crack, as if ready to break into two pieces. Spencer has several newer boards, both larger and smaller, but he really likes this one. So I said I'd have a look. I thought there was hope because the crack did not go all the way to the other side:
But there was a soft spot on the end of the crack:
First thing to do was to have a look inside:
Sanding off the top revealed a layer of carbon-kevlar fabric - nice! That stuff it really expensive, and the kevlar is almost indestructible. It was covered by a thin layer of fiber glass. The kevlar is probably why the board did not break all the way. On the other hand, the construction meant that just a partial layer of carbon provide all the structural strength. Carbon is quite brittle, so it just broke. Below the carbon was standard sandwich construction: high density foam (in a somewhat unusual bright red color), a thin layer of glass, and then the EPS core.
I cut out some of the sandwich layer, and removed a bit of foam underneath that was damaged:
Overall, the EPS foam was still in good shape, so I did not have to remove much. I then used polyurethane pour foam to rebuild what I had cut out:
Next, I had two options on how to proceed: rebuild the sandwich, or just glass over the foam. In nose repairs, I usually just glass over. That's good enough for typical use, and it the mast hits in a bad catapult, even a sandwich will break. But in standing areas, I discovered the hard way that rebuilding the sandwich is a better choice. The affected area was a bit a grey zone: it's in front of the foot pads, so it won't be exposed to the full stress of planing though chop, but it will get some load when not planing.
One issue here was that the kevlar does not sand well - it just gets all fuzzy. That would have made a smooth connection of the new sandwich harder. Other factors were the age of the board, and that the short days severely limit how much time I can spend doing repairs. Finally, it is possible that the internal damages is worse than it seems, and that the board will soon break completely, anyway. So I decided to just glass directly onto the foam. The cut out area got an extra layer of 6 oz carbon, and the entire crack got a layer of 6 oz carbon and a top layer of 4 oz S-glass. Here's what it looked like afterwards:
Now it just needs some sanding, a top coat, and some anti-skid. I'll skip the painting for now so that any damage that might indicated a pending break will be easier to spot. Spencer can always paint it later :-).
Yesterday brought some warm south westerlies around 30 mph, which drew a crowd of windsurfers to Kalmus. I escaped to Egg Island, with Jon and Gonzalo keeping me company. The trip to Egg Island near low tide was easy, with only moderate chop:
It was nice and flat at the outer sandbar for speed runs:
Jibing in the flats is always fun - here's Gonzalo and Jon up close:
We took turns standing in the warm water and holding the camera, which gave me motivation to plane through a few jibes:
Here's one filmed with the Clew View mount:
Jon and Gonzalo played around with duck jibes - here's one from Jon:
The wind at Egg Island was a bit lighter than in front of the launch at Kalmus, especially a bit further into the bay where the wind came across Great Island. A larger board and/or a larger sail than my 3S 96 and 4.7 wave sail would have avoided a bit of slogging every now and then. But on the way back, I was glad to be on the small board and sail, since the chop had gotten bigger, and I was quite nicely powered. Rocktober rocks!
After a surprising number of delays, Nina's new wing board finally hit the water today at Barnstable Harbor. Despite multiple rounds of epoxy coating, the board floated! I think it really helps that epoxy is lighter than salt water. On the other hand, Nina was able to carry the board to the water without being utterly exhausted, so perhaps it's not quite that heavy. Well, I did spent many hours sanding it, so maybe I removed a lot of that epoxy again, after all!
Fortunately, Nina had not problem wing foiling on the board, either, and actually like it. I think she did have problems seeing the board in the original foam blocks when we bought them at the local Home Depot, and ended up a bit surprised they ended up as a functional board. Here are a couple of pictures:
The board is unpainted; the colors are just a bit of pigment added to the top layer. This leaves the glass layer semi-transparent, so you can see every little issue underneath. Leaving the board this way should help us spotting any issues (like delamination) before they become a major problem. Perhaps more importantly, it also let Nina use the board a few days earlier.
The board is about 80 to 85 liters, 5 feet 5 inches long, and 26 1/2 inches wide. The weight is and shall forever remain unknown. The color scheme (with the foil) reflects the nationality of builder and rider :-)
Time for an update on my two current favorite topics - the foil jibe and Nina's wing board. As you'll see, both have been quite frustrating, but there is hope. Let's start with yet another foil jibe crash video:
This is one of my better tries, since at least I stay up on the foil the entire time. But the ending is quite typical for many of my tries: the rig ends up on the outside of the turn and a bit behind me. From there, I can't get it back to where it belongs before I crash. Often, the board starts turning back into the other direction; in the worst crashes, the inside rail comes up, and I fall to the inside of the turn, towards the foil.
I started a discussion asking for tips how to fix this problem on Seabreeze. I got tons of tips, but none of them really clicked fully. Eventually, I found a tutorial video that shows exactly the same crash (at 5:51 in the video). Right now, the link does not seem to be working, so I just show you a screen shot instead:
Letting the mast go so far to the outside puts so much weight on the wrong rail that the board just turns back. Heroic efforts to pull the rig towards you don't work either on the foil - they just make the crashes more spectacular.
I knew that this was the problem, but I did not realize why this was happening in most of my jibes (in some other crashes, I would pull the sail too far to the inside of the turn, so both sail and I ended up falling to the inside). Then, someone on the forum pointed out that in the good jibes in the video, the foiler moved the mast to the outside of the turn just before flipping the sail:
The mast is quite far on the outside - the left arm is fully extended to the side! But he manages to complete this jibe without any problems. This is very different from my jibe tries. I always tried to keep the mast to the inside of the turn the entire time. To make sure the mast would not go to the outside before I released the clew hand, I moved my front hand to the mast early, and did not move my back hand further towards the clew.
Then I remembered something I learned a long time ago in ABK camps: for the rig to flip "weightless", it needs to rotate around its center of effort, and not around the mast! The top of the mast is making a circle in the air as the rig flips when it flips this way, and there is no pull. But if the mast is pointing straight up (relative to the board surface), then the clew swings around, and the swing weight makes the flip "heavy" - you have to muscle the rig at the end.
In the session in my jibe crash video above, we had pretty good wind around 20 knots. My GPS showed that I was usually going at 10-12 knots when dead downwind in a jibe try, to I still had 8-10 knots of wind in the sail (and a bit more ifI flipped too early or too late). That made the sail flip quite quickly, which in turn increased the apparent weight, and made the rig "escape" from me to the outside of the turn.
The funny thing is that I remember my very first jibe tries on the foil: they were my best tries. I did not foil through, but I sometimes kept enough speed that the board never stopped planing, and I could get back up on the foil right away afterwards. But then, I started thinking and looking for advice ... and things started going downhill.
The one bit of advice that messed me up in particular was "keep the mast in front of you" or "keep the mast to the inside of the turn". In the "How to Strap to Strap Gybe - Windfoiling" video from Sam Ross that I talked about in August, Sam says "keep the mast upright and in front of you", and that does seem to work well for him. But he is on a faster foil in less wind, so his apparent wind during the sail flip is close to zero. That means the sail rotates slower and with a lot less power - it never escapes to the outside.
Thinking about this made me realize that I have a similar problem with the heli tack on the windsurfer in planing conditions. I can do heli tacks all day long in light wind, including one handed and (sometimes) no-handed versions, and pausing in clew first position. But the windier it gets, the more problems I have with the rig flip. In 15 mph, I may still get some dry heli tacks; but in 20 mph or more, my success rate drops close to zero. The problem? The rig flips too quickly and with too much power, so I end up off balance and cannot bring the rig back into sailing position. The cause? In more wind, I tend to power the sail up to much, which forces me to also lean the mast more to windward. When I then start the flip, the sail does not rotate neutrally! Do you see the common theme here?
So, next time I get a foiling session, I'll work on letting the sail rotate in a neutral position. I'll just have to put an Andy Brandt voice yelling "level the clew before the flip!" into my head! Somewhat counter-intuitively, letting the mast move to the outside of the turn right before the flip should make it easier to get it in front of me at the end of the flip.
Now to Nina's wing board (the "bubbles" part of the title actually referred to some problems I ran into with it, and not to my foil jibe crashes). Here's a picture of the issue:
After trying to "hot coat" the board to seal the little gaps in the fiber glass, I got tons of bubbles, where air escaped from the board while the epoxy was setting. I've had this happen before in repairs before I learned to only glass and seal when temperatures are dropping. So I concluded that I had not waited long enough for temperatures to go down. Out with the sander, and then try again ... with the same result. Maybe temperatures are changing to quickly outdoors, where I did all the work? Move everything into the house, measure temperatures, and try again! This time, I started late in the afternoon, and temperatures outside had dropped for hours before. Nevertheless, bubbles again! This time around, I could even see that some of the bubbles had tried to shrink again - they had little indentations on the top that must have happened in the middle of the night, when the room cooled down and the board finally did, too.
These tries to seal the board had kept me busy for a few days, but I had gotten nowhere. So I finally bit the bullet and sealed the entire board with acrylic putty, which has a work time of 2.5 minutes. It stinks like hell, and is a PITA to work with, but I coated the entire board. This time, it worked, although I could see that the cool down overnight had pulled the little putty plugs in a bit. Some of them had little round dents in the top that had been absent in the evening. Since there were more than 100 of those little holes in the board, and any single one of the plugs coming loose could lead to delamination, I feared that just painting the board would not be good enough. So I added another layer of light glass to the bottom and the rails to be safe. Since Nina actually wants to use the board, rather than just see me work on it, we decided to just tint the epoxy for this glass layer and the top coat layer. That means she can use the board at least a couple of days earlier. Since the top layers are semi-transparent, it also means we can still see the core and the glass layers, so if the board should show some of the delamination issues that XPS core boards are known for, we'll have a chance to see them early. Now, all that remains to do is (yet another) round of sanding, routing out glass covering the tracks and the carrying handle, and putting a leash plug in. Hopefully, the board should be ready for her in a couple of days. I am even 99.9% sure that it still floats, despite all those layers of epoxy that I ended up putting on. After all, I tried to sand most of the stuff off every time before trying again! Whether she'll be able to carry the board, which now feels rather "solid", to the beach may be another story...
This goes back more than a year, when ABK's Andy Brandt gave a foil jibe lecture. He said to put the feet near the rail of the board on opposite sides. On a typical foil board like the Wizard 125, that leads to a rather wide stance (you can see the stance nicely in the 360s in the video above).
Originally, my problem with this advice was that I was using a 71 cm slalom board with a narrow tail. But since I got a foil board a few weeks ago that's much wider in the back, I had another problem. It's probably easiest to explain with a video of a jibe crash:
There's a few things going wrong here. The first one is that I don't control the height well, and the board touches down. The second thing is that the board keeps banking more and more, eventually throwing me off to the inside. That's a pretty typical crash in my jibe tries. I would not mind touching down in the jibe, but have always been puzzled by the board throwing me off to the inside. That just does not happen when windsurfing!
I have been working on planing out of windsurfing jibes for a few decades. It was not until my first ABK camp in Bonaire that I reached a decent success rate, at least in good conditions. One of the things I remember very well from many earlier tries is that you never want to get pressure on the outside rail in a jibe. If you do, the board will immediately turn back, and a crash is virtually guaranteed. I must have verified that thousands of times.
Once I started foiling, I noticed that the foil turns a lot better than my windsurfing boards. So the logical thinking was that any pressure on the outside rail in a foil jibe would be a lot worse than when windsurfing. Maybe comparable to a carve 360 on the windsurfer, which will invariably fail if you flatten the board out at any point? So I tried to move my feet a bit to make this less likely - the front foot more towards the center, and the back foot not quite that far. If you look at my foot positions at the entry, you'll notice that they are quite similar to where they'd be going for a carve 360 on a freestyle board: front foot toes and back foot heel are both on the center line.
Of course, I should have just done what Andy Brandt said, and put my feet to the outsides. But my thinking was that I also need to shift some weight onto the front foot to keep the nose down - and with the foot on the outside rail, that would certainly make the board turn back! I even tried to hang down on the boom to make to push the nose towards the water. That works, but only until you flip the sail, when it's (almost?) impossible to keep mast foot pressure. So as soon as I flipped the sail, the sudden reduction in mast foot pressure would make the nose come up, typically leading to overfoiling and crashes.
Now back to the 360 video. After the initial carve, the sail moves to the back, and the upper body moves forward; the head ends up in front of both feet, almost over the mast base. This means that there must be quite a bit of weight on the front leg - at least half of the weight, if not more. But even though the foot is all the way near the outside rail, the board keeps turning very nicely! Clearly, my theory that putting pressure on the front foot on the outside rail must be wrong!
So it's time for a revised theory. The carve for the 360 (or the jibe) starts with a shift of the weight to the inside of the turn: the back leg. But as soon as the board is banked and turning, the weight can (and should) be distributed evenly over both legs. With little or no pressure in the sail, this stance is actually balanced relative to the push of the foil. This means that the turn radius remain constant. When it is time to flip the sail in a jibe, it's easier to maintain balance due to the wide stance and even weight distribution; the same is true for maintaining flight height.
Going back to the second video (my jibe crash), it is easy to see how changes in the foot positions could have helped. With the front foot closer to the outside rail, it would have been easier to keep the board at a constant angle. In addition, both feet should have pointed more to the front, which would have made it easier to stay balanced when the board touched the water and slowed down.
The funny thing is that I've seen how problematic "thinking" can be in many sports, all the way back to volleyball and judo in high school. I usually did fine when I just copied others or followed instructions, but as soon as I started reading books to "better understand" what I was doing, things started falling apart. The same thing happened over and over in many different sports, including windsurfing. But I just can't help coming up with theories :-). Can't wait to test the newest one on the water!
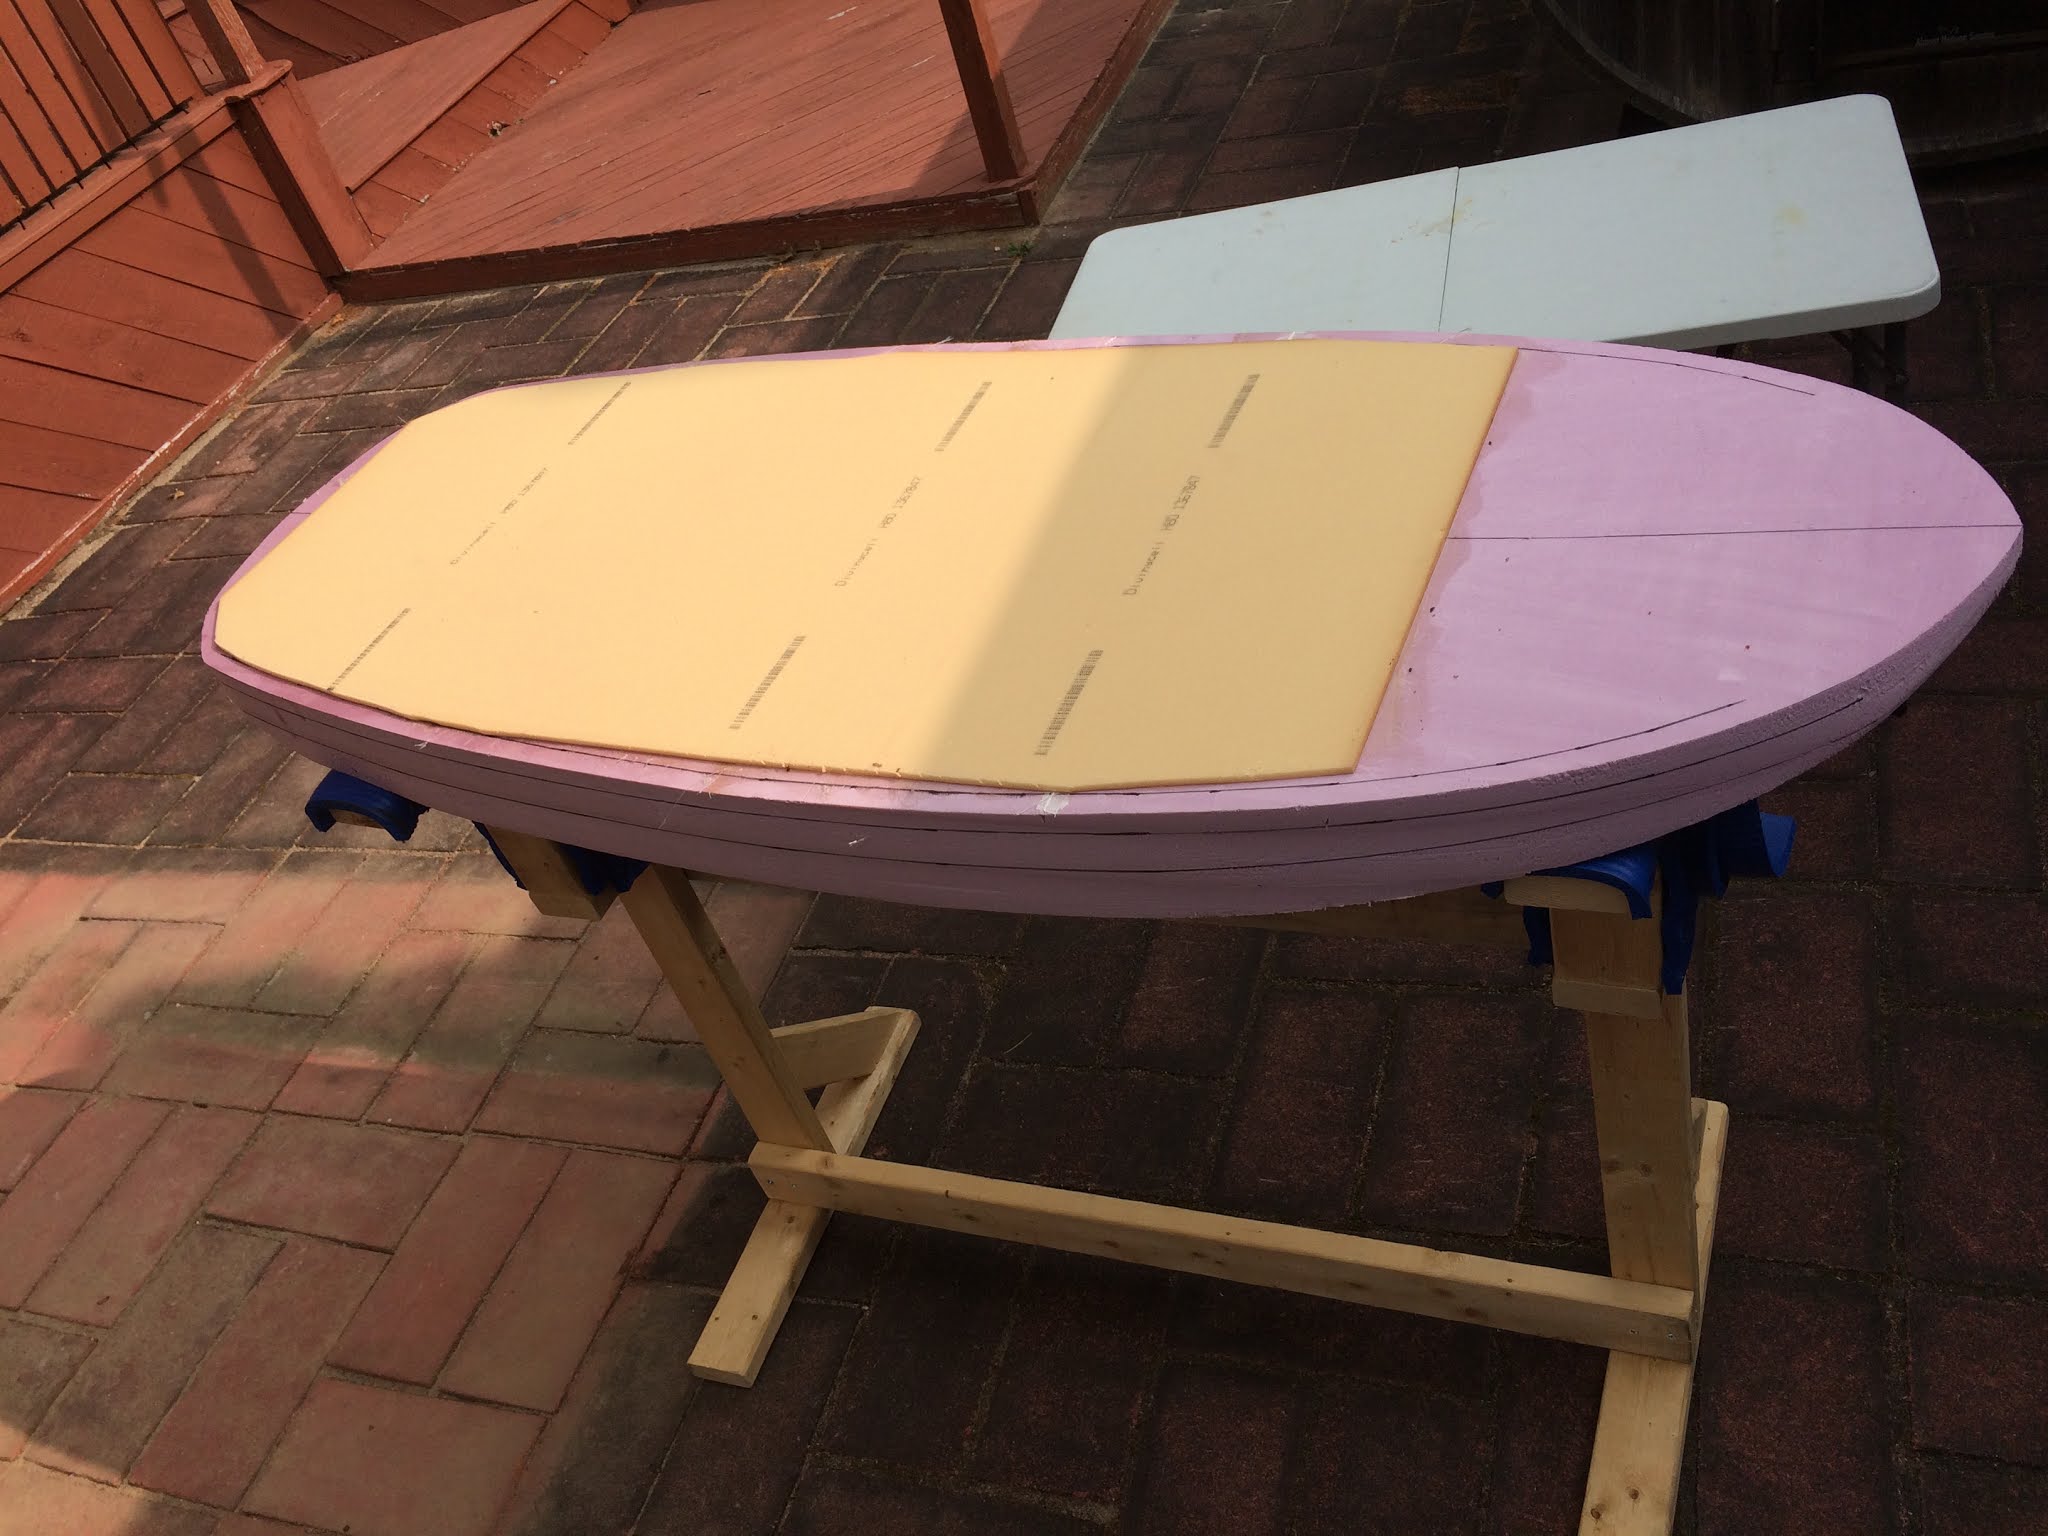
Below are a few pictures from progress on Nina's wing board.
Profile shaped, outline marked:
Table wire cutter setup:
Rough outline cut:
After cutting the outline with the table wire cutter, a few gaps became visible where the original foam blocks had indentations:
I filled the gaps with PU foam, which seemed to worked nicely.
After the fine trim of the outline with hand tools, I marked the rail lines, and then added a layer of 6 oz glass and 1/4 inch divinycell to the top. Since this is a wing board, a full sandwich construction which is typical for windsurf boards seemed like overkill. The board will not constantly slam into waves, so reenforcing the bottom does not seem necessary. However, a typical surf board construction, which uses just a couple of layers of fiber glass on top, would probably not have lasted long. Surfers stand on their boards only a few minutes each session, while Nina usually stands on her wing boards for at least a couple of hours per session. Add full-body pumps to get going to that, and the top would quickly delaminate. Therefore, I added a sandwich only to the top. The thickness of the hard PVC foam is twice of what's usually used in windsurf boards; thicker sandwiches are stronger. Instead of using vacuum, I just used a bunch of boards and weights to glue the sandwich foam on:
The weights seemed to work well enough:
Shaping the rails was the next step. The lines where the foam blocks were glued together were a bit harder than the foam, which made for some uneven sanding, so the shape is not quite perfect - but not too bad for the second board I ever built. Here's a view from the front:
A bottom view:
Between the step tail, rails, and plenty of nose rocker, the board almost looks more like a kayak than like a surf board.
In front, Nina wanted a concave bottom, which makes for smoother touchdowns and may also help getting the board out of the water. I first had to make a little tool to sand the concave:
Here's a closeup of the concave in front:
The next step will be to put the two US boxes for the track mount in. I prepared them today by encasing them in divinycell foam:
Putting the boxes in should be interesting. I've put tracks into 3 boards so far, but they were all existing windsurf boards. Routing the foam will be much easier than cutting through the sandwich, but require being more careful. I plan to put the boxes in so the tops are flush with the top of the foam, and then add one layer of glass to reenforce the track area. But the bottom will still be weaker than in the windsurf boards, so I'll add a couple of PU foam plugs below each of the boxes that connects them to the sandwich on top.
We got to use the foam wire cutter today, and it worked beautifully:
We cut a couple of profile templates out of cheap wood, which we then taped to the side of the foam blocks to guide the wire cutter. Cutting was easy overall, with noticeable slowdowns when the wire cut through the polyurethane glue between the sheets we had glued together. But with a bit of patience, the wire cut through the glue, too. Now it's a bit easier to see what we are building ... and Nina is starting to get quite excited.
There's a lot of rain in the forecast for the next few days, which means there will be little progress, since all the board building is done outside. Friday's weather looks nice, but there's also wind in the forecast, and ABK is in town for the annual camp, so we'll be at Kalmus. We won't do the ABK camp this year, mostly because it's run at a much smaller scale to allow for social distancing. We figured others can benefit more from ABK's excellent instructions than us (with more than 40 AKB camps between the two of us so far!). But we'll certainly stop by to say hello, and go foiling a bit.
Today's project was making a foam wire cutter. Here's the setup:
I mostly followed the instructions at instructables.com/id/Hot-wire-foam-cutter/, with the main variation to use a battery charger as a power supply, as someone had suggested in the comments. Since I did not know which wire would work well with the battery charger, I ordered a $20 multi-pack of nichrome wire rom Amazon that contains sizes from 22 to 36 gauge. I started with the 26 gauge wire, which did get hot enough to cut foam, but only very slowly. So I switched to 24 gauge, which worked fine for the test cut shown on the left. But before we can use it to dig out Nina's board, we'll have to make wood templates of the profile, which will be attached to the sides of the foam block to guide the wire.
Back when I built my first board, everything was shaped by hand - but the core was PU foam, which was really easy to shape. The XPS foam I'm using for this board seems a lot harder to sand, so the wire cutter will be a big help. Let's hope it works as planned...
It's been about 40 years since I last built a windsurfing board. That was tons of fun (and made relatively easy because the University of Konstanz offered a course, where they provided a room, ordered supplies, and gave some instruction) - so why not do it again?
Nina wanted to try a smaller wing board, since many wingers say smaller is better. Normally, we'd probably just take a trip to a place where you can rent a few, but this is not the best time for traveling. So - just getting a blank, putting tracks in, and wrapping it in fiber glass can't be too expensive, right? Especially since Nina wants a tiny board - only about 160 cm long. No need for a mast track of foot strap plugs, either!
We priced it out the easy and "perfect" way - a pre-cut, custom designed blank shipped to our door, S-glass and carbon, and a few other goodies. That came out to about $900 for material. Too much!
Back to the drawing board. Insulation foam from the local hardware store, cheaper fiber glass, no carbon, and a few more simplifications dropped the price to about $350. Sounds much better!
Once we had discussed this, Nina asked about once per hour "when are we going to the hardware store"? So we got started, and three days later, her board came into existence:
It's in there! I just have to cut it out, put foil tracks in, and wrap it up in some fiber glass. Granted, I work on a computer and not with my hands, so this will be slow going, but there's a reasonable chance this will get done before next year. If the little boss does not make me work too hard on this, I'll keep you posted about the progress here, and share some details about what I did, and what I learned.
Material
2 inch x 4 feet x 8 ft insulation board (2)
Electric foam cutter (and old socks to clean it while cutting)
Gorilla glue, 8 oz bottle
Lots of weights, clamps, and wood
Lessons
Check the foam carefully in the store. The pieces I used had a shallow groove on one side that I had not seen, which required a "Gorilla glue injection" after the first glueing
Clamps work better than weights. We tried weights for the first two pieces we put together, but even a couple of hundred pounds is nothing to expanding Gorilla glue. In the picture, the third piece that allows for decent nose rocker is glued on, and the clamps help things together much better. A few more pieces of wood to also compress the middle might have been useful.
We used to think that Kalmus in west wind is pretty much unsailable. A few times when we got caught when the wind turned from WSW (which is great) to W while windsurfing, we did not like it, not one little bit.
But it was a beautiful sunny day today; the wind was from the west; and BaHa did not look great because the wind was a tad strong for foiling, but predicted to drop - and the launch tends to have tons of greenheads this time of the year. Ever since Nina got her wings, she does not really mind gusty wind anymore - so to Kalmus we went.
To make a long story short, I'll just show you a picture with the GPS tracks and the wind readings for the time we were on the water:
The meter showed lulls of 4 mph and gusts to 30. The lulls were not quite that low on the water, but close enough, and the gusts felt like at least 30 mph. But we still had plenty of fun. When the wind averages dropped to 12 mph at 12 noon, Nina switched from her 4.2 m wing to the 5.4. I stayed with my 5.6 Freek, which I like more and more for foiling. I had to wait for wind to get going every now and then, and even came off the foil in lulls once or twice, but I was foiling most of the time - at times barely, at other times barely holding on, but always having fun. Here's a short video:
Eddie recently posted a picture of me foiling at Kalmus:
He said in the comments that I was shredding. I wish! This picture was taken when I came into shore and stopped in water too shallow for the mast. So I killed speed by going upwind, and tried to tilt the board sideways so the foil would not hit the ground, before I fell off backwards. But the picture looks cool.
The board in the picture is my new Progressive Riser 6.10 foil SUP that I bought for winging. This session was my 3rd on the board, and the first were I actually had fun. The board supposedly has 130 l, which should be plenty, but most of it is in the back, and the nose is 1 1/2 feet shorter than on my zombie foil board. Slogging the board is physical exercise, and not the fun kind. But when nicely powered as in this session, it's an awful lot of fun - less sensitive to the wind pushing it around, and very turny. That was a great session.
Yesterday, I took it out for a wing session - my first ever. Most of the session was spent walking back upwind, after going downwind while trying to stand up. It took more than an hour to figure out how to sail upwind (not on the foil), and about as long to get two very short foil rides. The second time, I had my feet placed a bit wrong, which resulted in very rapid curves as soon as the foil came out, followed by the crash. But this was about what I had expected for the first session. Winging is not easy! It will take a few more sessions before I get an idea if I like it. I would not have even tried it if I had not seen my lovely wife having fun on the same wing in 14 to 30+ mph winds. She makes it look so easy - I wonder if it will ever be that easy for me. Here's a short video of her foiling through a jibe:
A few days ago, Nina pointed out that GoPro cameras are not that expensive anymore. Since I always was curious how much speed she kept in foiled jibes when winging, and GoPros that are newer than our ancient 3+ have a built-in GPS, we just had to order one.
After a couple of snafus with non-fitting accessories and rotated videos, I finally got some useable footage from the camera yesterday. Here's a short video:
I can't say that I am a great fan of the GoPro Hero 7 Black. It's much heavy and slightly larger than the old GoPro 3+, and gets less than half of the battery life, even at low resolution and with image stabilization turned off. The desktop software that GoPro provides to get the GPS speeds showing in the video is poor (if you ask me about it on the beach, you may hear less "friendly" words). But fortunately, there's very nice third-party software available that even runs on Macs: Race Render. Race Render makes is very easy to add different gauges and graphs to the video that show the data from the GoPro GPS. You could also use an external GPS, but that would require synchronizing, which could be a bit difficult.
Here's a screen shot:
The movie from the GoPro 7, which I had mounted on top of my helmet, is shown as a small inset at the bottom right. The main picture is from the old GoPro 3+, mounted at the end of the boom with a ClewView. Race Render makes it really easy to synchronize the videos.
On the top right is a heading indicator; the display is adjusted to that the top is dead downwind (we'll get back to that in a minute). Below is a speedometer, and below that a speed graph. The picture above is from the jibe entry, shortly after unhooking and starting to carve downwind. The next picture is a second or two later, after oversheeting a bit:
At this point, my speed has already dropped from 30 to 24 mph. The next picture is dead downwind:
I've started to open up the sail for the sail flip; speed is down to 18 mph.
In the picture above, I'm just letting go with my back hand. The picture below is in the middle of the sail flip:
By now, my speed is down to 15 mph - I've already lost half of my entry speed. The speed will drop a bit more before I grab the boom on the other side:
13 mph is the lowest speed in this jibe, according to the GoPro GPS. I was also wearing a Locosys GW-60 GPS watch, which reported a very similar minimum speed of 14 mph for this jibe.
I was doing sail-first jibe as a practice for foil jibes. The image above is just as I am switching my feet. I'm approaching the new beam reach and have power in the sail again, so I'm not loosing any more speed.
A few seconds later, hooked in again and getting into the front strap. My speed is already picking up again.
There are a few things that I could have done better in the jibe, but that's not what the post is about. I mostly wanted to share how useful the built-in GPS from the GoPro could be together with the video when working on improving jibes, and that Race Render is a pretty cool tool for this. There's a free version that has most of the functionality, as well as several paid versions that allow customizations and removing the Race Render logo that the free version puts in the movie.
I wanted to do rail rides ever since I learned windsurfing a few decades ago. Eventually, I learned to do them on longboards thanks to ABK Boardsports clinics.
Foiling has replaced longboarding on lighter wind days now. But it seems my body still wants to do rail rides:
Unfortunately, my body forgot to tell my brain in advance, so it was completely unprepared and panicked:
I can highly recommend to not try this kind of crash. I hit the water in front of the foil, and the board and foil were still moving forward. Fortunately, I foil slowly, so the foil hitting my leg did not really hurt.
Apparently, this only encouraged my body to try again (of course, also without advance notice to the brain, which would have vetoed the idea). This time, it was in the middle of a sail-first jibe try:
This clearly was over-ambitious: not only did my body try a leeside rail ride this time, which is harder than the regular rail ride - but it also went for the one-footed, one-handed version. As soon as my brain noticed what was going on, it ordered my body to bail, and the board continued on it's own:
At least this time, I fell away from the foil, so the crash was harmless. But seeing that my body apparently was up to no good, I decided to not try any more jibes that session. So the foil jibe remains elusive. But on the upside, I discovered a new way of messing the foil jibe up. Perhaps if I remember to not do rail rides on the foil, I can get a step closer to making one! It would also help to place the backfoot more to the rail, and to not let the mast escape to the outside of the turn. The mast on the outside probably caused the leeside rail to come up, and the foot placed too close to the center meant I had no leverage to push it back down. Maybe next time...
After the session, I watched Spencer and Coon foiling a bit. Both of them had foiled just a few times before, and while the both got some decent runs, at other times, their attempts looked more like attempts to tame a wild bronco. That looked awfully familiar, and made me feel a tad better (or perhaps the after-foil beach beverage was to blame for that part).
Here's a short video from after the rail ride attempts:
After a year of foiling, I still struggle with the jibes. The goal of foiling through jibes on a regular basis remains elusive. Of course, I have all kinds of great excuses. My foil board is narrow - only 22 inches (56 cm) wide. Just about every article about foil gear in the German "Surf" magazine states that wider boards are easier to jibe when foiling. But this excuse seems a bit lame when I look at my lovely wife, who foiled through jibes on a regular basis .. on her skinny 90 l freestyle board. So I won't even bore you with my other excuses, which are even lamer.
Instead, I'll share a few insights I had after watching a couple of jibe tutorial videos from Sam Ross. Here's the step jibe tutorial:
The jibe is quite similar to a jibe on slalom gear. One of the differences is that he sails clew first briefly after stepping to stabilize; that's quite common for foil jibes even among racers, but unusual on slalom gear.
Overall, Sam's technique is very similar to what Nico Prien shows in his jibe tutorial video. One thing that looked very familiar in Nico's video was the "oversteering" mistake he shows at 5:44 in the video:
This has happened in many of my jibe tries: the board just keeps carving, and the foil seems to be pushing the board into an even harder carve when the windward rail catches the water. Nico points out that "you need to actively balance the bank" - in other words, flatten out the board to stop the turn.
I started trying step jibes on the foil, but moving the feet and the rig at the same time while the board is in the air always seemed a bit too much for me. Largely based on Andy Brandt's suggestion at the ABK camp in Hyannis last year, I switched to sail-first jibes instead, where you sail out in switch stance and move the feet later. I have no problems with sail-first jibes on windsurfing gear, but on the foil, they seemed just as difficult as step jibes. So maybe the tutorial video from Sam Ross, who calls it the "strap to strap gybe", would help:
Comparing the two Sam Ross jibe videos, there's one big difference I noticed: the position of the mast during the sail flip. In the step jibe, the mast is moved to the outside of the turn:
That's the same when windsurfing. But in the sail-first foil jibe, the mast does not move to the outside - it stays perpendicular to the board:
Since the board is banking into the turn, the mast is also leaning into the turn a bit. When teaching the jibe at the ABK camp last year, Andy Brandt said we should keep the mast to the inside of the turn. I guess this is what he meant! I over-interpreted his instructions, and thought that the mast should point even further to the water - something that's hard to do if you are not oversheeting.
Interestingly, during the sail-first jibe when windsurfing, moving the mast to the outside of the turn is not a problem at all. But the foil is much more sensitive, and moving the mast to the outside when letting go with the back hand immediately changes the carve, and makes it nearly impossible to complete the jibe dry.
When thinking about the instruction videos, I was wondering why foil racers always seem to step jibe, while many early foil jibe instruction videos used the sail-first jibe instead. Both Sam's and Nico's tutorials provide a clue when they talk about slicing the mast forward: on race foils, foilers are often going faster than the wind. That makes opening up the sail impossible, since you'd just get backwinded. On the foil, that means that the foil would probably shoot up and out of the water for a spectacular crash.
The sail-first jibe requires that you are going slower than the wind, since the wind pressure from behind flips the sail. In contrast, a step jibe also works when the apparent wind is coming from the front because you are faster than the wind; you just have to make the sail flip similar to the sail flip in a helicopter tack.
Both Nico Prien and Sam Ross are on race or freerace-type foils and boards. In Sam's "How to go Faster on the Windfoil" tutorial, he reaches speeds of 26 knots. But typical speeds on freeride foils like the Slingshot Infinity 76 or 84 are much slower. My typical cruising speeds on the i84 are around 10-12 knots, so I'm going slower than the wind speed most of the time. That makes the sail-first jibe possible, and it has one big advantage for "marginally coordinated" foilers like me: I can concentrate on one thing at a time, and don't have to move the sail at the same time as I move my feet. Time to go foiling!
Nina winging in 30 mph. Picture by Eddie Deveraux.
It was windy in Kalmus yesterday, with averages in the low 30s and gusts to 40 mph:
iWindsurf meter readings for Kalmus 8/3/2020
We went in the afternoon, when the wind was nice and steady. Nina wing foiled for almost 3 hours, and reported that she may have gotten closer to the upper end of the wind range for her 4.2 m wing. It was fluttering at times, and upwind angles were a bit compromised since she could not move the wing to the side as usual - too much power!
I decided to go for a session on the "slapper", as Australian wind foilers like to call windsurf boards. But since I'm not the biggest fan of high tide slapping in Kalmus WSW voodoo chop, I went over to Egg Island for some really flat water. I tried to get a few guys to come along, but without success - Gonzalo, who had indicated interest, decided to rig down from 4.7 to 4.2 after a few trial runs, and I did not have the patience to wait for him. High tide is the best time for speed runs along the sand bar, and the tide had been dropping for a while already! Besides, he had sailed Lewis Bay on a longboard many times, so he knew the way.
I ended up having the "kiddie pool" at Egg Island entirely for myself. I'd rigged my old 5.5 m Matrix sail since it has a ton of high end, and that was a perfect choice. The wind behind the sand bar tends to be a bit lower, and the flat water also allows for larger sail sizes. How flat, you ask? Have a look:
I was working on my sail-first jibes for foiling, which are a ton of fun in flat water. I learned on reason not to let the mast get way to the outside of the turn: the sail is a lot heavier than the freestyle sail I normally use, and when whipped around by the strong wind, was too heavy to be pulled back in. That resulted in a few fun high speed crashes before I got my act halfway together. Still needs a bit of work, since my speed dropped from a 30 knot entry speed to 12 knots after the sail flip. But it was fun, anyway!
I ended up getting a 32 knot top speed on my GPS watch, which is the fastest I've ever gone on a freestyle board. The little 22 cm weedie from Maui Ultra Fins held astonishingly well, even though it's the freeride version, not the speed or slalom version.
After about 2 hours, the tide dropped low enough to expose parts of the outer sand bar that is submerged during high tide. It's oriented at a right angle to the WSW wind, so it creates a nice setup to work on alphas (500 m runs with a jibe in the middle, and the ends of the run have to be within 50 meters). For that, I reverted back to the step jibe:
I just did a few tries before heading back to Kalmus through the chop. Since the wind was still up, going back upwind was super easy. Here are the GPS tracks:
It's been a hot and windy July. I've been on the water for 19 windfoil sessions, and windsurfed four times, often when the wind picked up so I could plane on a 5.0 or 5.6 m sail.
Yesterday was a day with a mediocre forecast, which tends to make for great foil days. I started foiling when averages were around 13-14 mph, which made it quite nice with a 5.6 on the i84 foil. Here are the GPS tracks for the day:
The flat water was nice for tacks, and encouraged me to try a few sail-first jibes. I ended up with a few reminders why you should not let the sail get to the outside of the turn. I also discovered a disadvantage of the sail-first jibe on the foil: if the board gets all wobbly after letting go of the back hand, crashing safely gets much harder since only one hand remains on the boom. It took me a couple of tries to understand that. The first one was a warning which I ignored; the second one was harder to ignore, since the board tilted sideways. That put the foil exactly where I was falling. Fortunately, I have a hard head even without a hard hat, so I did not even bleed after hitting the back of my head on the foil. It killed my appetite for additional jibe tries in the same session, though.
Instead, I headed into the flat water behind the Hyannis Port pier, and pushed the foil a bit faster than I had ever foiled before. By then, the wind had picked up into the mid-20s, and it was time to head back in. The strong wind made for a very interesting ride in steep chop. And then, it got even stronger, hitting 29 mph averages and gusts in the low 30s. Waterstarts, which were difficult, one-footed, and only in gusts at the beginning had long changed to the two-footed, "keep the thing controlled at all cost!" variety, were not placing enough weight on the front foot meant I was foiling before I was even over the board. But now, I was either getting catapulted right away, or the wind just grabbed under the board and flipped it over, completely ignoring the heavy aluminum foil. Not even body-dragging with one foot on the board, my usual fail-safe when things get crazy, worked - board and foil were blown out of the water and flipped over within a couple of seconds. Eventually, I discovered that body-dragging clew first from the leeward side worked, with the added benefit of being an excellent workout. After dragging a quarter mile downwind, the wind finally let up enough so that I could waterstart again, and foil in the last bit, with a fully flagged out sail. Meanwhile, Nina, who had been wing foiling on her 4.2 the entire time, stuck around and enjoyed that the strong wind let her foil through her jibes with ease. Maybe I need to get one of these things ... but I have the suspicion it just would not work quite as well for me.
Well, an interesting session it was, and certainly a memorable one - but also a lot of fun.
I've been windsurfing for more than 30 years, although this includes several multi-year periods where I did not windsurf at all. I got really hooked again a few years ago, after getting married to my lovely windsurfing wife, and starting to take ABK clinics. ABK also introduced us to windfoiling, which then led to winging. We mainly wing and windsurf on Cape Cod, with regular trips to places all over the world.