Sunday, October 23, 2022

Joanie's Van

 Our friend Joanie got a new van, so I took this as an excuse to play around with 3D software a bit to design the shelves for the interior. Here is what we came up with after a number of discussions:

Here's a little movie:

Nowadays, Joanie wings most of the time, so the rack has been designed primarily for that. But on occasion, she may want to take a couple of surf and windsurf boards on a trip, so we added shelves for those, too. With 2 boards on the top, the shelf could hold 5 boards, with plenty of empty space in the van.

The wing board will be the board shell handle the most, so the bottom rack is designed to make that easy. The idea is to slide the board onto a big piece of wood, which may be painted or covered with plastic to allow for wet boards. In front will be 2 fixed "bumpers" - think of yoga blocks - that keep the board in place. In the back, there are a couple more yoga blocks to keep the board from moving around. To take the board out, she'll just remove the block in the back, and then slide the board out. On the sides, there are a couple of boards that keep the board from sliding out to the side. They'll be covered with yoga mat pieces or similar. For longer trips, the board has holes in the front and back so that the board can be strapped down.

Above is another solid wood board that makes a shelf for the wings. If there are no windsurf boards in the van, that shelf should easily hold all of Joanie's wings (and she has quite a few!). But there's also space on the ground, below the shelves.

One concern was that stuff might fly around and become dangerous in an accident, so we paid special attention to fix the rack in place. The support studs on the left side will each be mounted with two connectors to the L tracks on the side of the van. The right supports will be fixed at the bottom to a piece of wood or aluminum that is attached to the L tracks at the bottom. The front support on the right will also be attached at the roof.  Boards will be strapped to the top shelves. All connectors and screws will be stainless steel. The individual L track connectors are rated to 1833 lb, so the setup should survive collisions without releasing the attached gear.

I created the model in Blender. Most measurements should be reasonably accurate, except that the thickness of the support studs etc. may vary, depending on what is available. Additional images are below. The large boxes in the images are 1 foot tall, the small boxes 1 inch. The original Blender file is available here

If you want to look at the model interactively with your browser, you can download the design file in .dae format, and use an online 3D viewer like the one at 3dviewer.net/. A tip for 3dviewer.net: after opening the downloaded .dae file using drag & drop, select the hierarchical view on the left, and hide the "Van sides" by clicking on the eye - it should look like this:

Here are views from the different sides (screen shots from Blender). View from the back (click on images for a larger view):

From the side:

From the top:

From the top, with the middle shelf removed:
The two holes for the strap at the front in the wing board support are visible, the ones in the back are hidden by the shelves above it. 

3D view from the back right: 
3D view from the back left:

The little grey cylinders indicate where the supports are attached to the L tracks on the side of the van. Those may not be cylinders, but rather pieces of wood or something else in the right size to bridge the distance to the side of the van (which is about 7 inches wider in the middle than at the top). For screwing the connectors into the L tracks, Joanie ordered US Cargo Control L Track Double Lug Threaded Stud Fittings from Amazon.

Building the rack would be a lot of fun, but it would take me forever, and I'm supposed to work (at least on the non-windy days :-). So I'll have to leave that to someone else - but learning to use Blender while developing the design was a lot of fun.


Thursday, October 20, 2022

Flatter Is Better

 We had great wind yesterday, and went winging. The session, however, was anything but great. So many things did not go as planned .. I don't really want to talk about it. But I'll say one thing: it was choppy.

Today's wind was very similar, but fortunately, the session was not. Fortunately, my lovely wife had suggested a change of scenery: Wacky Bay. That's were I had my first wing foil session that felt like fun about 3 months ago, so convincing me to forgo the chop for some flat water was not too hard. 

I'll tell you the story with little bits and pieces from my GPS tracks today. Here's the start of the session:

The drops after each run means my initial jibe attempts were quite bad, and usually wet. Notice how several times, the speed quickly increases a lot, followed by a sudden drop. That means I stayed true to my plan to not move the back foot forward when starting a jibe. I did, however, start the carve exactly the same way I had done many thousand times on a windsurfer: with most of my weight on the back foot. Not only did my muscles remember that "this is the way to turn downwind", but it also made sense to my brain: the back foot was across the center line on the side where I wanted to turn, and the front foot on the other side, with the toes barely touching the centerline of the board.

But not everything that seems to make sense actually does make sense. The "back foot carve" approach meant that I shifted my weight towards the back of he board. If you've foiled, you know what that will lead to: the foil will start climbing. Up I went. That meant less drag, so I also went faster. Faster means more lift, so I went up more. Positive feedback loops are fun! In this case, they also let to a wet ending.

After reproducing this three times in a row, I finally remembered that throwing all your weight onto the back foot is not such a great idea on the foil. Fortunately, there are a few windsurfing moves that requiring carving downwind on your front foot, one of them being the downwind 360 in the foot straps. Since I had worked on this move during many ABK camps, there even was a bit of muscle memory for this from my many hundred tries! The only modification I needed to add was to move my front foot a bit, so that the toes ended up on the other side of the center line.

Turning downwind his way, with even weight on the toes of both feet, did indeed keep the foil from jumping out of the water. I practiced that a bit doing S-turns, and then managed to keep decent speed through a jibe:

In this jibe, I followed the advice a couple of friends had given after my last post, and did not switch my feet at all. Switch stance with a wing felt a bit funny, but I managed to pick up a bit of speed again, and even foil for a little while before crashing. Simple jumping around to switch the feet after completing most of the turn seemed easier, so I went back to doing that.

What followed next was a lot of fun:
Of the next 14 jibes, 12 were dry, and I came out with a bit of speed left. Two of those 12 dry jibes were a bit wobbly, but in the others, I kept the board speed near or above 5 knots even in the slowest section of the jibe. A few of these jibes felt really good. In one jibe, I was foiling the entire time, although the board touched the water a little bit for perhaps a second. The minimum speed in this jibe was 8.12 knots, which is about 2-3 knots above the stall speed of the foil. It's also a knot faster than my previous best wing jibe, and a new alpha 500 PB (personal best) for winging.

It's been a little less than three months since my last session at this spot, when I got the feeling that wingfoiling could be a lot of fun for the first time. Back then, I was happy to get 8 runs in, before I was exhausted and call it a day. Today, 16 wing sessions later and in very similar conditions, I managed to get decent jibes in 12 out of 14 successive tries. For a slow learner like me, that is a rather rapid improvement! Wing foiling seems quite a bit easier than windfoiling, at least once past the initial hurdles. According to my session log, it took me 157 windfoil sessions to get a jibe as good as today's jibe (measured by the minimum jibe speed) - and that happened at Bird Island in Corpus Christi, where the water is even flatter, and after a private lesson with Andy Brandt.

Of course, I did not cleanly foil through a wing jibe yet, and repeating today's success in choppy conditions will likely take many more practice sessions. But fun and confidence are growing, so there's an increasing danger that I'll become a wingnut, too.


Sunday, October 16, 2022

Wrong Steps

 Wing jibes and tacks look sooo easy. Just watch Johnny Heineken:


But the facts that wing jibes are easy for the likes of Johnny and Nina unfortunately does not mean that they are easy for me. The GPS tracks from my last wing session tell the story:
The speeds at the bottom show that about every other turn included a full stop - that usually means a little swim. Not a single jibe was foiled through, or even close. But I was in Lewis Bay, where the chop was small and orderly, and the SE wind was steadier than in front of Kalmus beach. So why were my jibes no better than in previous sessions (if anything, they were worse)?

I was on a new wing, but I absolutely cannot put the blame on the new gear. My Duotone Unit 6.5 was an absolute pleasure to use, powerful in lulls, well behaved in gusts, and always very predictable. Instead, I might have to blame my approach to learning new things on the water: after some initial progress, I then have to discover all the possible things I can do wrong, usually by repeating them several times. That's not necessarily an approach that makes you learn things fast, or one that I can recommend for any other reason - but it's how I learn.

This time, I learned how you are not supposed to step in the wing jibe, at least not while learning on a huge beginner board in choppy water. What I wanted to do was a "toe side to heel side" jibe, where you switch the feet before you jibe so that the toes are pointing to the wind (in windsurfing, that would be a "switch jibe"). In preparation for the foot switch, I move my feet closer together, so that they are almost parallel. But then, instead of completing the foot switch, I chicken out and go straight into the jibe, planning to complete the stepping at some later point in time. Do you see where this is going? It took me a couple of sessions and maybe 20 or 30 crashes to figure this out...

The typical problem was that things got really wobbly as soon as I was near downwind, and had no more pressure in the wing. With the wing over my head, I often found myself pushed onto my heels, and then off the back of my board. It's a fun crash, with the board taking off and jumping joyfully - but it's not what I wanted to do. After all, I'm supposed to be the one having fun, not the board!

After a couple of dozen such crashes, and few more jibes here I recovered my balance through heavy wiggling (that fortunately nobody was close enough to see), and then watching Johnny Heineken start all his carves from a very wide stance in the movie above, I could no longer reject the theory that maybe, just maybe, putting the feet closely together before starting a slow carve might somehow be the cause of my crashes. What was missing was some forward-backward stability, and having the feet right next to each other is one of the worst possible stances to achieve this. So next time, I might just try to start the turn from a regular, wider stance, or perhaps even complete the stepping into a switch stance before reaching downwind.

There are a few great examples of perfect foot switches in the Johnny Heineken video above. Starting from the rather wide stance, Johnny first shifts his weight onto the back foot briefly, which makes the foil go up. He then steps forward with the back foot, right into the foot step, and then back with the old front foot. So briefly, all his weight is pretty far forward on the board, which makes the board go down again - hence the initial push on the back. It looks too easy when he does it!

Here's my current favorite wing jibe tutorial video:

Tuesday, September 27, 2022

Wing Progress and Board Demos

 It's been windy the last week - tell me, what can a poor boy do? Well, your's truly has been winging a lot - 5 of the last 6 days. The only break day was not caused by lack of wind, but rather by us not being ready to go out in temperatures close to 10 C (50 F). 

Today, all that TOW has paid off. Here's a picture that tells the story:


If you're familiar with the area, you may notice that I did not start at Kalmus today, but instead launched from Sea Street Beach. When windfoiling, I often sailed over to this area to practice jibes in the noticeably flatter water. I tried that with the wing, too, but since every turn is a jibe, and my jibes are still often wet, that was so much work that I was exhausted when I made it up there. Windfoiling half a mile upwind with a board that's easy to take was a lot easier, even before I started using the harness! So why not start at Sea Street - it's off season, yeah! I called Joanie, and she also came to try out a "new to her" spot, bringing along Jay (who decided to stick with Kalmus) and Bob.

The session ended up being absolutely excellent. I made substantial progress on jibes, which mainly means that I can now depower the wing downwind, and switch hands, without falling off. Well, sometimes, that is. In the best tries, the board even kept turning while I switched hands. But even if it did not, it was often easy to get wind into the wind on the new side to turn the board around more, and then hop-switch the feet. Several times, the board starting foiling again right away after the foot switch. The GPS tracks show that I kept a board speed of 6-7 knots in these jibes, which means the big 2000 front wing kept pushing the whole way through, even though the board was on the water. Fun!!

A couple of days ago, my lower arms had started hurting early in the wing session. Jay later remarked that he had seen me ride nose-high - a very useful observation. Apparently, I had reverted back to my old ways of plowing throw the water, with low speed, the foil at a high angle of attack, and plenty of power in the wing. So today, I concentrated on keeping the board flat, nose down, with minimal wing pressure. I experimented a bit with where to stand, and found that narrowing my stance seemed to help a lot. I had a few runs where everything felt super-easy and super-enjoyable. Maybe I finally got a glimpse of why so many windsurfers and windfoilers have switched to winging.

In my recent sessions, and especially today, I was very happy with my Stingray 140. We had gone to a Cabrinha demo session in West Dennis yesterday, where I had a chance to try two of their foil boards. The first one was a 98 l board, which turned out to be hopelessly too small for me. The chop threw me off the board every single time very quickly; I don't think I ever got a hold of both handles. After a session on my Stingray, which felt very easy in comparison, I then tried the 118 l board, this time with a Cabrinha 1600 front wing. The board is about 2 feet shorter than the Stingray, and 10 cm narrower, but had enough volume and width to at least let me grab both wing handles. After that, though, the trouble started. In the first try, the board started foiling up while I was still on my knees, thinking about getting up. In the next tries, I managed to eventually stand up. But when I stand up, my feet are quite far apart, and the board was so sensitive to any weight shift that I'd either stick the nose into the water, or send it towards the sky while falling off the back. Maybe I could have learned how to deal with this if I'd tried another hour or two - but why, if I can have fun on my old-fashioned and loooong board? So I returned the demo board quickly, and went back to having fun on the Stingray. But at least I learned that I definitely do not want any wing board that shorter than 6 feet anytime soon. Sure, Nina can sail boards that are shorter than 5 feet (she got her workout demoing a 44 l board), but I am no Nina. Cabrinha is a kite brand, and maybe for kiters, boards that are almost 6 feet long feel gigantic. For me, they are ridiculously short. But then, I started windsurfing on 12 ft longboards, which I still think are great (just not quite as great as something with a foil underneath). Maybe the short and tiny boards are just great for radical carving in the hands (or rather, under the feet) of experts. But for this wannabe winger with limited talent and balance, what such a board regards as an instruction to carve radically was just a little unconscious, and probably unintended, weight shift. For me, all that "swing weight" from my long, heavy Stingray means that such little weight shifts will be of little consequence, and that carving jibes on unsteady legs will be nicely predictable. Even with all the length and weight, I can still turn the Stingray faster on the foil than any windsurf board I ever was comfortable with.

Another thing about many of the short foil boards is that they are often quite tall (or fat, if you prefer).  To pack almost 120 liters into a frame shorter than 6 ft and narrower than 2 1/2 ft, the numbers for the remaining dimension has to go up. Which is not problem, once you're in the air and standing near the centerline - but on the water, any additional thickness only increases the instability. I've done a nice experiment to verify this by adding a "foil platform" to an old slalom board. I did not increase the width at the waterline, but added perhaps an inch of two in height, which dramatically improved the usability of the board ... for balance training. But maybe that's the topic of a future post.

Tuesday, September 13, 2022

Learning by Teaching

 I learned a surprising lesson last weekend during the ABK camp: that teaching others can be a fantastic way to learn. After a couple of years where I did not participate in a single ABK camp, I had major withdrawal symptoms, so I definitely wanted to be part of this year's camp on Cape Cod. I told Andy that it did not matter to me if I joined as a camper or a teacher, and since one of his regular teachers was out due to surgery, and his usual backup teacher could not get away from his job, teaching it was!

I spent the three mornings teaching a "never-ever" beginner. That was great in several respects, including that I was familiar with one-on-one beginner lessons. After taking the windsurf instructor course with Coach Ned a few years back, I had taught several beginners over the years, and the last time was just a few weeks ago. My student did great, learning to tack and going upwind on day one, and having a blast on the next two days, even when the conditions were quite challenging with very light wind and considerable boat chop on day three. He had to deal with some health issues that made physical activity harder for him than for my previous students, but he did not let that keep him from trying hard and doing very well. I was proud of him, and will always remember his energy and positive attitude. I can learn a lot from him in this respect!

In the afternoon on the first two camp days, I helped out a bit with the advanced groups. I started working with Joanie on the wing tack, after listening to Andy's lesson. I have never even tried a tack on the wing, but the lesson was quite clear, and Joanie wanted to practice on the beach, since the wind was too light for foiling. The tack we practiced is the one where you switch the feet first, then turn into the wind and move the sail to the other side. I often switch my feet when windsurfing in light wind, for example to do a new school duck tack, so that seemed easy to me. Watching Joanie step, it became clear that we needed to work on two things: 1. stepping onto the center line, and 2. not moving backward (or forward) when changing the feet to switch. Initially, she had stepped to the side of the center line, and ended up further back on the board. The center line issue was easy to fix, but the stepping backwards was harder, since we started by stepping back with the front foot behind the back foot, and then stepping forward with the back foot. The only way to getting close to not moving back was by taking a larger step forward. After that, we focused on moving the wing to the new side, which we both picked up quickly. 

I thought I had learned what I needed to do for a wing tack, which I thought was great. But going over it in my head a few hours later, I realize that what we did on the beach would never work on the foil. By stepping back with the front foot behind the back foot, the body weight would shift to the back, and the nose of the board would start to come up. Lifting the front foot to move it forward would shift the weight even further back, which would quite likely result in overfoiling and crashing. Perhaps an advanced foiler would be able to do this kind of footwork, lifting the nose on purpose first, and then pushing it back down when stepping forward. But a beginner? 

So I asked my lovely winger wife, who often foils the the vast majority of her tacks, how she switches her feet. The answer: first, step or shuffle your feet closer together, and turn the front foot more towards the nose of the board. Second, step forward with you back foot first, placing it next to the front foot. Third, step back with the old front foot. The entire step sequence moves the body weight much less forward and backward, and should keep the flight height a lot steadier. When I practiced the corrected footwork the next day with Joanie on land, she got it right away, and it felt a lot more natural than the "wrong" footwork. I later made her go out with the beginner windsurf gear (big board, small sail), and had her practice going switch to get her used to the feeling of sailing with a twisted body. She even tried a duck tack when I told her that duck tacks are the best way to get out of a switch stance on a windsurf board!

So within about half an hour of practice on land, and a bit of time to think about it, I learned a rather important piece about how to go switch when winging, which is highly relevant for both tacks and jibes. Fast learned like Nina can figure such things out on their own quickly, but a fast learner I am not. It probably would have taken me multiple days of consistently crashing before I even would have figured out that my approach to stepping might be wrong ... and that's the best cast scenario. But the other thing I learned from this is that foiling wing tacks are a lot simpler than foiling windfoil tacks, and I think this is also true for jibes.

On the second day, Andy put me in charge of the advanced group practicing light wind freestyle for an hour, while he was giving a lecture. That was an interesting challenge. Admittedly, light wind freestyle is something I am reasonably good at, but several windsurfers on the advanced group are very talented and skilled. The first think I learned was that the teacher has to actively approach the student - when you just stand in the water, they will mostly be off practicing something, and mostly ignore you. That even happens to Andy, and perhaps explains why he is so good at giving loud advice. The next thing I learned was that I was able to see quite well what the students were doing wrong, and suggest changes to fix the problems. A couple of times, being on very small gear was part of the problem - several students were working on new light wind tricks on their high wind gear, which barely floated them. One of them did extremely well, but he is clearly one of the most talented windsurfers I have seen. Others were struggling on the small gear, but then very quickly made progress when I put them on the big beginner gear. For us "average mortals", it is a lot easier to learn light wind freestyle on big, stable boards first, before switching to smaller boards. There are exceptions to this rule: moves that require the board to turn, but where the body remains stationary, like upwind or downwind 360s, can be just as easy or even easier on smaller boards. But most moves that include a sail throw or stepping are much easier to learn on big boards.

Looking back at the more than 20 ABK camps that I have participated in, this one was definitely at or near the top with respect to how much I learned: about attitude, perseverance, teaching (thanks to many, much appreciated, tips from Andy), wing foil tacks and jibes, and more. I'm already looking forward to the next time I get to teach.. and I can't wait until we have enough wind for me to wing foil again!

Tuesday, July 26, 2022

Easy Winging?

 We went winging yesterday. After 8 wing sessions over the last 2 years, I finally came to the conclusion that winging could perhaps be easy, even for me. Sure, Nina makes it look easy every time, but in my first 7 wing sessions, it was hard work, every single time. There was just one session during an ABK clinic in Florida where I had a bunch of runs with decent control. But when I tried to reproduce that in the following weeks, my success was limited; even when I got up on the foil, it seemed way harder than windfoiling. I took another wing lesson during our recent trip to Cabarete, and learned a few more things - but my success was limited to maybe 50 feet of foiling before the inevitable crash. 

My tendency was to blame the gear, the conditions, or my slow learning. There's a bit of truth in all that -  it took me forever to figure out how to set up the foil properly for winging. But what really helped me was watching an instruction video:

This helped me realize that I had always been standing too far back on the board when trying to wing. I typically tried to stand in (almost) the same position as in windfoiling, except for the foil being mounted a bit more forward. But in windfoiling, there is extra weight pushing the nose of the board down that's in front of both feet: the rig (and any weight in the harness) pushing down on the mast foot. Trying to stand too far back means that the foil will be angled upward too much, and the nose of the board will be pointing too high. That often results in the foil just shooting out of the water, and a big splash when the clueless winger (that's me) hits the water half a second later. With a bit more "skill" and a lot more effort, the winger may be able to keep the foil in the water - but it's plowing through the water, which requires a lot more pressure in the wing to keep going. Which, in turn, give the (incorrect) impression that winging is hard work and no fun. But that's what I got in my first 7 sessions.

At least one of my two wing teachers, and probably both of them, had told me what I needed to do, but I needed to watch another video to really understand:

The key is that as the foil starts to lift the board out of the water, you need to do 2 things:

  1. Shift weight to the nose to flatten out the board, and reduce the angle of attack of the wing.
  2. Sheet the wing out - on the foil, you need less wing pressure than when trying to take off.
I tried exactly that yesterday, and it worked! Surprise? Not! Why did I not realize this earlier? I think my windfoiling "muscle memory" got in my way here. In windfoiling, one easy way to get on the foil once you are at take-off speed is to sheet out. That reduces the pressure on the mast foot and thereby on the nose of the board, angles the foil up, and lifts the board out of the water. Then, to push the nose down so you can foil at a stable height, just sheet in again. So, to stabilize the flight height after take off, you sheet in - the exact opposite of what you do when winging! 

My session yesterday was short, less than an hour (and quite a bit of that time was spent walking gear back upwind). But I managed to get on the foil in a controlled manner in every single run, and flattening out the board and sheeting out worked to keep the pressure in the wing manageable. Another key take away for me from the instruction videos was the placement of my feet. By angling the knees before standing up, it was easier to keep the feet close to the centerline. I'm not sure if I ever even checked where I placed the feet before; placing them further to the outside makes everything much more wobbly and uncomfortable.

A couple more things surprised me yesterday. One was that I was quite comfortable in relatively strong winds, with gusts in the mid-30s and higher (I winged between 12 and 1 pm):
The 4.2 wing felt perfectly fine, except in the strongest gusts near the end. If I had used a sail with the foil instead in these winds, it's quite possible that I would have been somewhat uncomfortable (I've done a couple of hundred windfoil sessions by now, but almost all of them were in lighter winds).

The other surprise was how easy jibing seemed. I fell in at least one of the jibe attempts, but also had a couple of dry jibes, including one where the board remain on the foil until past downwind. In another jibe where I set the board down on the water before turning, it came back up onto the foil when dead downwind. I was nowhere close to foiling through a jibe, but compared to the jibe struggles I still have when windfoiling, the wing jibe sure seems a lot easier. It looks like this time, I won't wait for a few months before trying this wing thing again!

Saturday, July 9, 2022

Gear for sale

There's too much gear in our garage that we don't use anymore, so we are putting it up for sail. This includes foil gear, a SUP that can be used for windsurfing (even beginners), and lots of windsurfing gear (boards, sails, and booms). All sales are pickup in Cape Cod, cash only. If interested, contact us on Facebook or by email or private message.

Foil Gear

2021 Starboard SuperCruiser foil (A-)  $650

Includes:

  • 1700 front wing, 370 rear wing, 87 cm windsurf fuselage, screws
  • 85 cm alu mast (standard) and 65 cm alu mast (for shallow water/beginners)
  • gear bag 
This is a great foil for cruising, suitable for beginners, in very good shape.

Armstrong HS850 A+ system front wing (B+) $420


Slingshot track adapter (new, unused)(A) $50

SUP / WindSUP

BIC AceTech 10.6 (B) - SOLD

Windsurf gear

Slalom/Speed gear

RRD XFire 90 slalom board (A-)  $400 (or $500 with 2 slalom sails)


The perfect board to go fast on flat water. Very easy to sail for a slalom board (but not a beginner board!). Very good condition.

Slalom sails: Hot Sails Maui GPS 6.6 and 5.0 (A) - $120 each


Both sails have seen very little use, and are in excellent conditions. $120 for one sail, $180 for both, or $500 for both sails and the XFire 90 board.

Slalom Sails: Maui Sails TR7 7.0 XT / TR8 6.3 (sold) / TR7 4.7 (A) $140 each


All sails are in very good to excellent condition. Buy one for $140, two for $200, or two and the XFire 90 board for $500. 

Windsurfing: Longboards

Mistral Equipe 2 with 3 fins (A-) $260


Great longboard for cruising and longboard racing. Very good shape. Can be used for teaching beginners.

Fanatic Ultra Cat (B) $200

Beautiful classical longboard, 1987 design. Tons of fun in light to medium wind. Nina won lots of races on this board.

F2 Lightning (B-) SOLD

Windsurfing - Miscellaneous 

2018 Fanatic Skate 86  (A) $850


Bought 2019 and not used much, since Nina started winging in 2020 and has not used it since then.

2011 Fanatic Skate 90 (B-) $300


This board has twin tracks for foiling, in addition to the original power box. Nina started foiling on this board.

Mark Angulo Custom 72 l (A) $450

Mark Angulo built this board for Nina when we stayed on Maui for 6 weeks. She used it only a few times since then.

Slim carbon boom (Goya) 130-180 (B) - SOLD

Slim carbon boom (Aeron) 150-200 (B-) SOLD

Sail: North Idol 4.0 (B+) - SOLD

Sail: North Ice 3.4 (A) - SOLD


Thursday, June 30, 2022

Small Steps and Fast Foils

Foiling jibes are hard, if you ask me (just don't ask Nina). I've spent countless our watching instruction videos; have taken camps and private lessons with one of the best foil instructors in the world; bought new foil boards hoping that they would solve my jibe problems; and tried jibing on the foil often enough that I discovered dozens of ways to screw it up. But I still cannot foil through jibes consistently. 

Here are some of the things that I remember from various lessons and videos:

  1. Use a wide board, it's easier (my Stingray 140 qualifies!)
  2. Take a big step close to the rail to start the turn. That's suggested in many videos, except that Nico Prien suggested a smaller step closer to the center line.
  3. When it's time to switch feet, step heel to heel, bringing the old front foot to the back foot. 
  4. Move the old back foot straight into the new front strap.
Can you spot the problem? When I followed step 2 and took a big step, then my crashes in step 3 would be virtually guaranteed, and often scary (like the one where I fell onto the foil with the back of my head .. in case you wondered why I now always wear a helmet). I've blogged about my problems with step 3 before, step 4 remained a pipe dream - I count it as a success when I step on top of my foot straps, instead of landing in front of them, as I usually do (which is 100% effective at dropping the board onto the water).

One issue that I could never wrap my head around was this: if I take a big step to the outside rail, and then try to bring my other foot heel-to-heel, that's also a pretty big step. While taking the second step, all my weight is near the edge of the board, and the board is above the water - meaning it is very tippy. Maybe I'm just to slow? But whatever it is, the board would tilt as if I was trying to start a rail ride, and I'd have to hope that my fall would be away from the foil.

Things finally started to click when I watch a video about the One Hour Classic at Lake Garda:

About 45 seconds into the video, the boat close to the jibe mark captured great footage of several foil jibes. Everyone is on a wide board (#1), and everyone does takes a wide step to the carving rail (#2). But when it comes to moving the old front foot to the back, nobody follows rule 3! Instead of a single step, every single racer takes multiple steps with the new back foot. The first step is a small step out of the front strap, a bit to the back and towards the center of the board. This is immediately followed by the carving foot sliding forward a little bit into the foot strap. After that, there are one or two additional small movements of the back foot that bring it to the other side of the board. Except for the first step onto the carving rail, all foot movements are small.

Considering that the flying board is very reactive, and that we don't want to unsettle it while switching the feet, these multiple small movements make a whole lot more sense than a single big step! I went back to look at some of the instructional videos I had watched, and in most of them, the instructor also takes multiple steps to move the old front foot to the new side. They just don't ever talk about it. All those foilers who learned the foil jibe relatively quickly must have either noticed it, or figured it our on their own. But I know I'm not the only foiler who has a hard time learning to foil through the jibe!

So I'm excited about trying this our in my next foil session (and to try some ideas I have about the tack footwork, too). But I also found it quite exciting to read that at the One Hour Classic, foils were significantly faster than fins. The winner in both fin and foil categories, Jordy Vonk, completed 21 laps in the foil race, but only 19 laps in the windsurf race. The recorded top speeds were also faster for the foils, with 33.59 knots vs. 31.84 knots for fins. Just as amazing was the average speed of 27.4 knots for the hour. On the GPS Team Challenge, the fastest 1-hour result ever posted for the US was about a knot slower (26.46 knots by PWA sailor Taty Frans on slalom gear). So an average speed of 27.4 knots with 20 jibes in Lake Garda chop is pretty amazing! 

Saturday, June 25, 2022

GPS Speedreader 2

 I have just posted a new version of GPS Speedreader at ecwindfest.org/GPS/GPSSpeedreader.html. Since this version adds a feature specifically for dual GPS units, like the ESP/e-ink loggers I mentioned in my last post, I changed the version to 2.0. This version also has a few additional new features, including support for the FIT file format, which is used my many GPS watches. In this post, I'll explain some of the new features, and give examples where they help to improve the accuracy of GPS speeds.

"Intelligent Averages" for dual GPS units

When a speedsurfer in Belgium developed a cheap DIY GPS unit with an e-ink display that can be mounted on both sides of a boom, making it easy to check the current speed when windsurfing, my friend Mike from the GPS Team Challenge suggested to calculate speeds as averages of the two GPS units. In theory, the average of two separate measurements should be more accurate than a single measurement. We discussed a few ideas about how to calculate the averages, and came up with "intelligent averages". Let's first look at some speed data from a recent foiling session:

The two GPS units mounted on each side of the boom gave nearly identical speeds for the vast majority of points. There were some ups and downs, but they were well synchronized between the units, which indicates that they were probably real changes in speed. Sometimes, these speed changes may be due to boom movements - pumping, for example, is easy to spot. In the graph above, the little spike as the speed drops is due to moving the rig during a tack. When data look like in the graph above, speed averages will be very similar between the two units, and the averages will also be very close.

But that's not always the case. Here is another example from a top-10 second run from a different session:

Here, the green speed track shows a couple of pronounced spikes. The little inset shows the speeds and error estimates for the first spike. For the two points where the green speed is about 1.5 knots higher than the red speed, the error estimates are roughly 50% higher for the green data. Since one of the two tracks is clearly more accurate than the other, it does not make sense to calculate a plain average - instead, GPS Speedreader uses the only speed of the more accurate data. That's the "intelligent" part of the "intelligent average" (the blue lines).  Not really hard, so maybe "not dumb" would be a more accurate description, but "intelligent" sounds better.

In the example above, there was a reason why the green GPS had worse data than the red: the green GPS was using only 2 satellite systems (GPS + GLONASS), while the red GPS unit used 3 satellite systems (GPS + GLONASS + Galileo). In the region shown, the additional 5-6 satellites from the Galileo system helped the GPS to be more accurate.

The effect of the artifact in the picture above was small, between 0.1 and 0.2 knots over 10 seconds. But sometimes, we can see much larger differences between two boom-mounted GPS units:

This section is from a crash, where the boom side that the red GPS was on ended up under water, and the boom side with the green GPS stayed above water. Under water, the red GPS lost track of most of the satellites, at times only being down to just 3 or 4 satellites. In contrast, the green GPS stayed above water the entire time, and kept tracking 16-17 satellites. The green GPS correctly reported that my speed dropped from 15 knots to almost 0 in less than a second - but the red GPS kept reporting speeds around 15 knots, eventually even increasing to 27 knots. Very interesting, considering both GPS units were attached to the same boom!

This is very typical behavior for u-blox GPS units in windsurfing crashes. Keep in mind that GPS chips were developed for cars, not for speedsurfing. Cars very rarely end up under water, and when they do, GPS accuracy will be the last thing the driver worries about. But cars often drive under bridges or through tunnels, where they loose GPS reception for a short time. In these situations, the "dead reckoning" behavior that the GPS chip shows is perfectly reasonable - most likely, the car will keep going at about the same speed. 

But in windsurfing crashes where the GPS ends up under water, things are different, and GPS chips that "fantasize" about steady or increasing speeds can be a problem. If you look closely at the data in this example, you can see that the error estimates rose quite slowly after the crash - it took almost 8 seconds before the +/- estimates reached 4 knots. An error estimate of 4 knots happens to be the default value for speed accuracy filters in older versions of GPS Speedreader, since this threshold makes sense for Locosys GPS units like the GW-60 watch. But for u-blox based GPS units, it it much too high, as this example shows (and I have seen examples where crashes led to incorrect GPSTC postings, and at least one false personal best).

In GPS Speedreader version 2, this problem is addressed by using different accuracy filter thresholds for u-blox based data. For typical u-blox data (5 Hz or higher), the accuracy threshold has been reduced from 4.0 to 1.2 knots. In the example above, this filters out the speeds in cells with a red background (the blue line is where the error estimates exceeds the old threshold of 4.0). The file format is used to determine which threshold should be used - .ubx and .aoa files use the u-blox threshold, other file formats use the higher (Locosys) threshold.

While it is uncommon for "dead reckoning artifacts" after crashes to lead to errors in top speeds, these artifacts can often distort the total distance for a session. The use of dual boom units and the "intelligent averages" practically eliminates this problem, since at least one of the two units will typically keep good satellite reception, and therefore report accurate speeds.


Monday, May 16, 2022

How Much Better Are More Satellite Systems?

After following a thread about a cool DIY GPS on Seabreeze for a while, I ended up building a few of these ESP 32, e-ink, u-blox M8-based GPS units myself. Looking at the results from my first few tests, I noticed that the units used fewer satellites than my older, Openlog-based DIY loggers. Fortunately, the firmware for the ESP32 logger is now open source,  which made it easy to verify that the loggers use the default settings for the Beitian GPS chips for the satellite networks used: they use only two global navigations satellite systems (GNSS), the United State's GPS system and the Russian GLONASS system. The BN chips support also support the concurrent use of a third system, the European Galileo satellites, and my older prototypes use those. 

This brings up the question: does using 3 GNSS systems give better accuracy than 2 GNSS systems? The chip manufacturers seem to think so, seeing that newer GPS units can track 3 or even 4 systems. But sometimes, these developments are driven by marketing, competition, and what's technically possible, and not necessarily by what makes really makes sense. So I decided to treat this as an open question, and tried to collect and analyze some data.

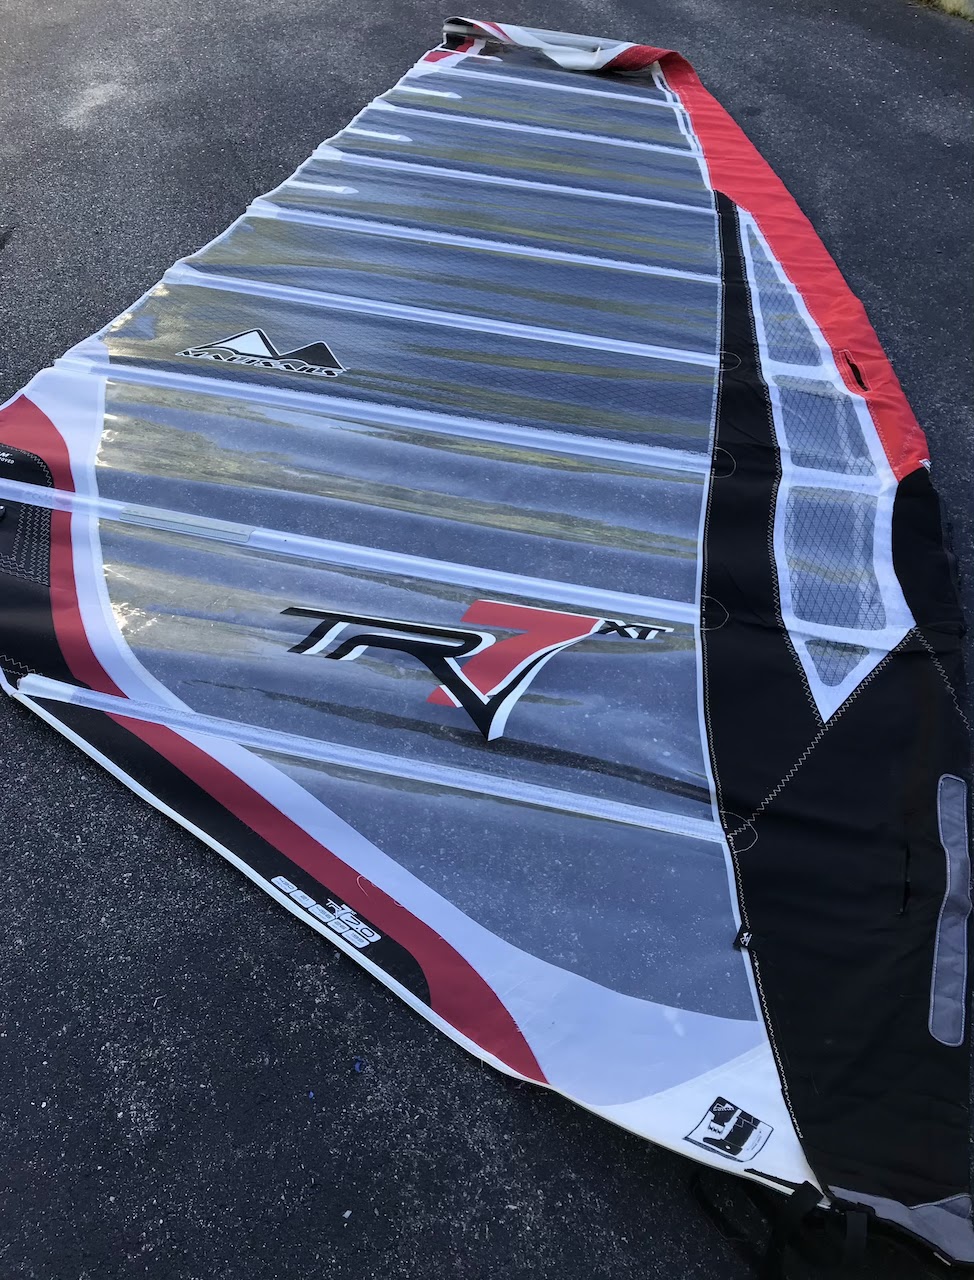
Unfortunately, the wind did not play along with my plans, so my tests were limited to bike rides and driving around in the van. But driving tests also have a few advantages. For example, it's easier to use multiple GPS units that remain in fixed positions relative to each other. In this post, I'll present some result from today's test drive, which seem to be quite typical, based on what I have seen in several other tests in the past week. Let's start with a picture of the test setup:

I used a total of six GPS units on the dashboard of my high roof van. The two units on the left are prototypes that have been approved for use on the GPS Team Challenge a couple of years ago, based on the Openlog logger and Beitian BN880 and BN280 GPS chips. The four units in the GoPro dive housings mounted on the wood board are the new ESP32 e-ink prototypes, and they all use the BN220 chip. The BN220 has a smaller antenna than the BN280 and the BN880; the BN880 is the only chip that has an "active" antenna, all other antennas are passive. Both Openlog prototypes and two of the ESP loggers were configured to use 3 GNSS systems (GPS+GLONASS+Galileo); the other two ESP loggers were configured to use only 2 GNSS system (GPS+GLONASS). 

Here's a graph that shows the speeds of the six units on top, and the accuracy predictions (sAcc) that the chips provide below:

Let's have a closer look at a region:


This is from a heavily wooded stretch of road, and the different GPS units show quite a bit of jitter, often disagreeing by a couple of knots for a few points. In this region, the green curve seems to be the worst offender - but that's a subjective assessment, and there are other regions where other colors look worst. Looking at speed curves can provide some hints about what's going on, but it is also subject to "expectation bias": if we expect the 2 GNSS units to be worse, then we're more likely to "see" this in the data. What we need is a quantitative analysis!

If we knew the actual speed at any point, it would be trivial to get actual accuracy numbers - but we do not. Even the presumably best GPS unit, the BN880-based logger, shows a substantial amount of jitter or "noise" (and for the van, we know with absolute certainty that the rapid ups and downs are noise, since it is physically impossible for the van to repeatedly gain and loose a couple of knots within a fraction of a second).

But the noise we see has a lot of randomness to it, so if we average the data from multiple GPS units, we can remove a lot of the noise. So for the following analyses, I used the average speed from five of the six GPS units at any point as the "true speed estimate", and then looked at the difference in speed from the sixth unit to calculated the "estimated actual speed error". I then averaged the absolute error over 200 points for the graph below:

There's a lot of information here, but one thing jumps out at me: while there is a lot of variation in the error over the few minutes depicted in the graph, but mostly, the curves keep their relative position to each other: yellow is worst most (but not all) of the time, and the light blue logger shows the lowest error estimates most of the time.

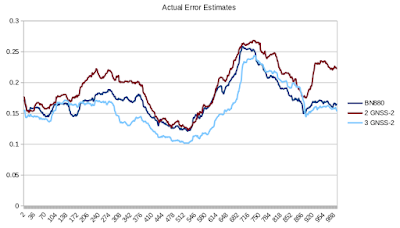
To get back to our "2 vs 3 GNSS" questions, let's just look at three units: the BN880 unit, and one 2 and one 3 GNSS ESP logger. Here's the first pair of ESP loggers I had built:

For most of the time, the 2 GNSS unit had higher errors than the 3 GNSS unit. The difference was largest in the region near the end, where all three units show the highest errors.

Now to the second pair of ESP loggers:

Again, we see that the 2 GNSS unit has higher errors than the 3 GNSS unit and the controls. Interesting, the 3 GNSS ESP logger seems to be more accurate than the BN880 here (although we need to keep the limitations of our "true speed estimate" in mind!).

For comparison, let's look at a different region from the test drive, where there were no trees and very few other obstructions next to the road:


The speed graph shows that the different GPS units were in much closer agreement, and the sAcc error estimates provided by the GPS were lower and steadier than in the "noisy" region above. Let's have a look at the "estimated actual speed errors" for this region:

This region was much shorter, so the graph shows averages over only 20 points (rather than 200 in the first example). Note that the actual speed errors in this region are much lower than in the previous region:  between about 0.015 and 0.07 knots, compared to 0.1 to 0.4 knots. At this much lower error level, the curves do not follow the same "better or worse" trends - instead, they are often closer together, and trade ranks more often.

When speedsurfing in a straight line with a GPS that is properly positioned to have a clear view of the sky, we are generally much closer to the second, "lower error" example above than to the first, "high error" example. Extrapolating from the data above, we would expect differences between tracking 2 and 3 GNSS systems to be relatively small. In the one windsurfing session that I did manage to squeeze in,  that is indeed what I saw - but I was using only 2 ESP loggers configured for 2 GNSS systems, and the BN880 logger as a control. But the same general trend was also true in other biking and driving tests I did.

But when GPS signal reception gets poorer, the data indicate that using 3 rather than 2 GNSS systems will give more accurate data. The difference is not dramatic, but it is real. For a GPS worn with an armband, reception can get poor when the armband slips, and the body and arm block satellite signals; with a GPS watch, an underhand grip will cause poorer reception. One of the cool things about the ESP GPS is that the cheap cost and good display allow for mounting a unit on each side of the boom, so that you can see your speed while surfing. Getting close to the boom with the body could also possibly impair the GPS signal reception, although this should be largely limited to one side. Another common source of speed artifacts are crashes, where the GPS becomes submerged, and sometime "fantasizes" high speeds, but without triggering the filters in the GPS analysis software. Here, two boom-mounted units offer a potentially large advantage, since one of the two units will typically remain above water, and keep getting good reception. By looking at the reported error estimates from both units, GPS analysis software could theoretically automatically pick the unit that retains reception, and ignore the under-water unit completely. I plan to look into this as an addition for GPS Speedreader ... once I have more examples from windsurfing or foiling sessions with two units.


Saturday, May 7, 2022

Foil Tack Footwork

 Yesterday, a few videos came out that showed fully windfoil tacks that were fully foiled through - here is one of them: 


Sure, Balz Müller had shown fully foiled tacks a couple of years ago already, but his tacks were Duck Tacks. Duck Tacks may be "easy" for world class freestylers, but they out of reach for most regular windfoilers and windsurfers, and they are just about completely impossible with large race sails. 

In a regular windsurfing tack, you always loose just about all speed when tacking. In foiling, that's not the case - even mediocre amateurs like yours truly can keep a few knots of speed for the entire tack, and good racers keep so much speed that they pop right back up onto the foil. But compared to other foil disciplines, that's not really that good. America's Cup boats foil fully through their tacks all the time, often at speeds well above 30 knots. Advanced wingfoilers often foil through their tack; I recall a wingfoiler in Florida who would always jibe on one side, and tack on the other, without ever touching down.

But until yesterday, all windfoil tacks that I have seen had included at least a brief moment where the board touches the water. In my tacks, that usually happens when I put my front foot in front of the mast, or a moment later when I shift my weight from the back foot to the front foot. No surprise here - put your weight far forward, and the board goes down. So the critical question is: how can you get around the mast without putting your body weight in front of the mast? Just head over to Windsurfing.TV on Facebook and check the foil tack video there (https://fb.watch/cSdv0BHLkY/): it has a big smiley face that hides the foot placement.

So let's have a closer look at how the windfoiler in the video above solves the problem. Here is a screen shot as he carves into the tack:

It's a hard carve, but there's nothing unusual about it. That happens a little later:

Here, Harry started moving his front foot. Note that he has not moved the back foot, so it carries all his weight, which pushes the board higher out of the water. In a normal tack, we usually put down the foot in front of the mast, and then step forward with the back foot - but Harry does not stop moving his foot until it is on the other side of the mast:

With both feet behind the mast, his weight remains further backward. It also helps that the sail is tilted far towards the back, moving even more weight to the back. Let's look a fraction of a second later:
Harry is now moving his old back foot to the other side, again without putting it down in front of the mast. Note that the other foot has moved quite far back on the board already, again putting weight towards the back of the board. In the final picture of this series, he has both feet on the new side, and well behind the mast:
Clearly, the talented 15-year old Harry Joyner has figured out how to get around the front of the mast without ever putting his weight in front of the mast, which allows him to clearly foil through his tacks.

For a bit more detail, here are screen shots from a different perspective, taken from a video Harry posted on Instagram (https://www.instagram.com/p/CdOOkRzMA3f/):

Carving hard into the tack.

Two seconds later, still carving hard.

Just about to move the front foot.
The front foot is starting to move. All the weight is on the back foot.

The old front foot goes around the mast to the new side, without stopping in front of the mast. The front hand moves to the new side on the boom. Note that the board having all weight on the back foot has pushed the board higher out of the water. 


The foot does not stop moving, but right away slides further back on the new side.


The old back foot starts moving, with the old front foot already quite far back on the new side.


Harry keeps moving to the back of the board. The new front foot briefly touches the board behind the mast.


The new front foot keeps moving back, with all weight on the back foot.


All that weight on the back has kept the foil flying high.'

Ready to get going on the new tack.

It will be interesting to see how many racers will be foiling through their tacks this year. My bet is that many of the top guys will. In hind sight, it seems a bit surprising that it took several years of racing before someone figured to out how to foil through tacks. But maybe that's because all those windfoilers with a windsurfing background has the "step before the mast" too deeply engrained in their muscle memory.