Saturday, September 26, 2020

When Thinking Fails

 No, this is not a political post - it's a post about the foil jibe. Let me start with a video from some beautiful  foil 360s:


The video led to a discussion on the Seabreeze forum that made me realize I had some misconceptions about the foil jibe.

This goes back more than a year, when ABK's Andy Brandt gave a foil jibe lecture. He said to put the feet near the rail of the board on opposite sides. On a typical foil board like the Wizard 125, that leads to a rather wide stance (you can see the stance nicely in the 360s in the video above).

Originally, my problem with this advice was that I was using a 71 cm slalom board with a narrow tail. But since I got a foil board a few weeks ago that's much wider in the back, I had another problem. It's probably easiest to explain with a video of a jibe crash:


There's a few things going wrong here. The first one is that I don't control the height well, and the board touches down. The second thing is that the board keeps banking more and more, eventually throwing me off to the inside. That's a pretty typical crash in my jibe tries. I would not mind touching down in the jibe, but have always been puzzled by the board throwing me off to the inside. That just does not happen when windsurfing!

I have been working on planing out of windsurfing jibes for a few decades. It was not until my first ABK camp in Bonaire that I reached a decent success rate, at least in good conditions. One of the things I remember very well from many earlier tries is that you never want to get pressure on the outside rail in a jibe. If you do, the board will immediately turn back, and a crash is virtually guaranteed. I must have verified that thousands of times.

Once I started foiling, I noticed that the foil turns a lot better than my windsurfing boards. So the logical thinking was that any pressure on the outside rail in a foil jibe would be a lot worse than when windsurfing. Maybe comparable to a carve 360 on the windsurfer, which will invariably fail if you flatten the board out at any point? So I tried to move my feet a bit to make this less likely - the front foot more towards the center, and the back foot not quite that far. If you look at my foot positions at the entry, you'll notice that they are quite similar to where they'd be going for a carve 360 on a freestyle board: front foot toes and back foot heel are both on the center line.

Of course, I should have just done what Andy Brandt said, and put my feet to the outsides. But my thinking was that I also need to shift some weight onto the front foot to keep the nose down - and with the foot on the outside rail, that would certainly make the board turn back! I even tried to hang down on the boom to make to push the nose towards the water. That works, but only until you flip the sail, when it's (almost?) impossible to keep mast foot pressure. So as soon as I flipped the sail, the sudden reduction in mast foot pressure would make the nose come up, typically leading to overfoiling and crashes.

Now back to the 360 video. After the initial carve, the sail moves to the back, and the upper body moves forward; the head ends up in front of both feet, almost over the mast base. This means that there must be quite a bit of weight on the front leg - at least half of the weight, if not more. But even though the foot is all the way near the outside rail, the board keeps turning very nicely! Clearly, my theory that putting pressure on the front foot on the outside rail must be wrong!

So it's time for a revised theory. The carve for the 360 (or the jibe) starts with a shift of the weight to the inside of the turn: the back leg. But as soon as the board is banked and turning, the weight can (and should) be distributed evenly over both legs. With little or no pressure in the sail, this stance is actually balanced relative to the push of the foil. This means that the turn radius remain constant. When it is time to flip the sail in a jibe, it's easier to maintain balance due to the wide stance and even weight distribution; the same is true for maintaining flight height.

Going back to the second video  (my jibe crash), it is easy to see how changes in the foot positions could have helped. With the front foot closer to the outside rail, it would have been easier to keep the board at a constant angle. In addition, both feet should have pointed more to the front, which would have made it easier to stay balanced when the board touched the water and slowed down.

The funny thing is that I've seen how problematic "thinking" can be in many sports, all the way back to volleyball and judo in high school. I usually did fine when I just copied others or followed instructions, but as soon as I started reading books to "better understand" what I was doing, things started falling apart. The same thing happened over and over in many different sports, including windsurfing. But I just can't help coming up with theories :-). Can't wait to test the newest one on the water! 

Tuesday, September 15, 2020

Cutting and Shaping

Below are a few pictures from progress on Nina's wing board. 

Profile shaped, outline marked: 


Table wire cutter setup:


Rough outline cut:


After cutting the outline with the table wire cutter, a few gaps became visible where the original foam blocks had indentations:


I filled the gaps with PU foam, which seemed to worked nicely.

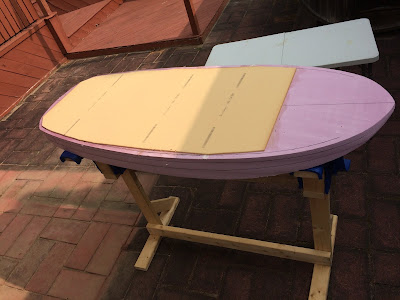
After the fine trim of the outline with hand tools, I marked the rail lines, and then added a layer of 6 oz glass and 1/4 inch divinycell to the top. Since this is a wing board, a full sandwich construction which is typical for windsurf boards seemed like overkill. The board will not constantly slam into waves, so reenforcing the bottom does not seem necessary. However, a typical surf board construction, which uses just a couple of layers of fiber glass on top, would probably not have lasted long. Surfers stand on their boards only a few minutes each session, while Nina usually stands on her wing boards for at least a couple of hours per session. Add full-body pumps to get going to that, and the top would quickly delaminate. Therefore, I added a sandwich only to the top. The thickness of the hard PVC foam is twice of what's usually used in windsurf boards; thicker sandwiches are stronger. Instead of using vacuum, I just used a bunch of boards and weights to glue the sandwich foam on:


The weights seemed to work well enough:

Shaping the rails was the next step. The lines where the foam blocks were glued together were a bit harder than the foam, which made for some uneven sanding, so the shape is not quite perfect - but not too bad for the second board I ever built. Here's a view from the front:

A bottom view:

Between the step tail, rails, and plenty of nose rocker, the board almost looks more like a kayak than like a surf board.

In front, Nina wanted a concave bottom, which makes for smoother touchdowns and may also help getting the board out of the water. I first had to make a little tool to sand the concave:

Here's a closeup of the concave in front:
The next step will be to put the two US boxes for the track mount in. I prepared them today by encasing them in divinycell foam:


Putting the boxes in should be interesting. I've put tracks into 3 boards so far, but they were all existing windsurf boards. Routing the foam will be much easier than cutting through the sandwich, but require being more careful. I plan to put the boxes in so the tops are flush with the top of the foam, and then add one layer of glass to reenforce the track area. But the bottom will still be weaker than in the windsurf boards, so I'll add a couple of PU foam plugs below each of the boxes that connects them to the sandwich on top. 


Wednesday, September 9, 2020

Profile Cut

We got to use the foam wire cutter today, and it worked beautifully:

We cut a couple of profile templates out of cheap wood, which we then taped to the side of the foam blocks to guide the wire cutter. Cutting was easy overall, with noticeable slowdowns when the wire cut through the polyurethane glue between the sheets we had glued together. But with a bit of patience, the wire cut through the glue, too. Now it's a bit easier to see what we are building ... and Nina is starting to get quite excited.

There's a lot of rain in the forecast for the next few days, which means there will be little progress, since all the board building is done outside. Friday's weather looks nice, but there's also wind in the forecast, and ABK is in town for the annual camp, so we'll be at Kalmus. We won't do the ABK camp this year, mostly because it's run at a much smaller scale to allow for social distancing. We figured others can benefit more from ABK's excellent instructions than us (with more than 40 AKB camps between the two of us so far!). But we'll certainly stop by to say hello, and go foiling a bit.

Tuesday, September 8, 2020

Making a Foam Wire Cutter

 Today's project was making a foam wire cutter. Here's the setup:

I mostly followed the instructions at instructables.com/id/Hot-wire-foam-cutter/, with the main variation to use a battery charger as a power supply, as someone had suggested in the comments. Since I did not know which wire would work well with the battery charger, I ordered a $20 multi-pack of nichrome wire rom Amazon that contains sizes from 22 to 36 gauge. I started with the 26 gauge wire, which did get hot enough to cut foam, but only very slowly. So I switched to 24 gauge, which worked fine for the test  cut shown on the left. But before we can use it to dig out Nina's board, we'll have to make wood templates of the profile, which will be attached to the sides of the foam block to guide the wire.

Back when I built my first board, everything was shaped by hand - but the core was PU foam, which was really easy to shape. The XPS foam I'm using for this board seems a lot harder to sand, so the wire cutter will be a big help. Let's hope it works as planned...

Monday, September 7, 2020

Building Nina's Wing Board

It's been about 40 years since I last built a windsurfing board. That was tons of fun (and made relatively easy because the University of Konstanz offered a course, where they provided a room, ordered supplies, and gave some instruction) - so why not do it again?

Nina wanted to try a smaller wing board, since many wingers say smaller is better. Normally, we'd probably just take a trip to a place where you can rent a few, but this is not the best time for traveling. So - just getting a blank, putting tracks in,  and wrapping it in fiber glass can't be too expensive, right? Especially since Nina wants a tiny board - only about 160 cm long. No need for a mast track of foot strap plugs, either!

We priced it out the easy and "perfect" way - a pre-cut, custom designed blank shipped to our door, S-glass and carbon, and a few other goodies. That came out to about $900 for material. Too much!

Back to the drawing board. Insulation foam from the local hardware store, cheaper fiber glass, no carbon, and a few more simplifications dropped the price to about $350. Sounds much better! 

Once we had discussed this, Nina asked about once per hour "when are we going to the hardware store"? So we got started, and three days later, her board came into existence:
It's in there! I just have to cut it out, put foil tracks in, and wrap it up in some fiber glass. Granted, I work on a computer and not with my hands, so this will be slow going, but there's a reasonable chance this will get done before next year. If the little boss does not make me work too hard on this, I'll keep you posted about the progress here, and share some details about what I did, and what I learned.

Material

2 inch x 4 feet x 8 ft insulation board (2)
Electric foam cutter (and old socks to clean it while cutting)
Gorilla glue, 8 oz bottle
Lots of weights, clamps, and wood

Lessons 

  • Check the foam carefully in the store. The pieces I used had a shallow groove on one side that I had not seen, which required a "Gorilla glue injection" after the first glueing
  • Clamps work better than weights. We tried weights for the first two pieces we put together, but even a couple of hundred pounds is nothing to expanding Gorilla glue. In the picture, the third piece that allows for decent nose rocker is glued on, and the clamps help things together much better. A few more pieces of wood to also compress the middle might have been useful.